Google Calendar Integration allows learners to automatically sync their class schedules with their personal Google Calendar. This ensures they receive reminders, stay organized, and never miss a session.
Enabling Google Calendar Integration (Admin Side)
Follow the steps below to set up Google Calendar integration for your batches:
Step 1: Go to Batch Settings
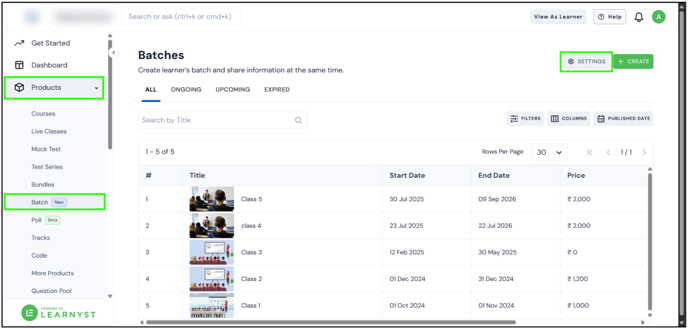
- Log in to your Admin Dashboard, Select the batch to configure, then click the Settings button in the top-right corner.

- A form will appear asking for two details: Client ID and API Key. (only if admin has "Owner" access will be able to access settings)
👉 To get these, you’ll need to create credentials from Google Cloud Console.
Step 2: Enable Google Calendar API in Google Cloud Console
-
Open Google Cloud Console in a new tab. A Search bar will appear, In that search bar, type Google Calendar API.

- In the search bar, type Google Calendar API.

Click on the result, then click the Enable button.

Step 3: Create a New Project
When you enable the API, Google will ask you to link it to a project.
-
A popup will appear. Click on New Project (top-right corner).

-
Enter the following details:
-
Project Name (e.g., “Learnyst Calendar Integration”)
-
Organization Name
-
Location
-
-
Click Create. Your new project will now be created.

Step 4: Configure the OAuth Consent Screen
Before creating the credentials, you need to configure the consent screen:
-
Click on API & Services.

- Go to API & Services > Credentials. Click on Create Credentials

- Select OAuth Client ID.

-
You’ll first be asked to Configure Consent Screen. Click on it.

- Click Get Started.

Fill in the following details:
-
App Name (example: “Learnyst Batches”)
-
User Support Email (your support email)

- In the Audience section, select External.

- Add your contact email address.

- Accept the terms and click Create.

Step 5: Create OAuth Client ID
Now that the consent screen is set, you can create the OAuth Client ID:
-
Go back to Credentials.
- Click Create Credentials → Select OAuth Client ID.

- In Application Type, select Web Application.

- Enter a name (e.g., “Learnyst Calendar OAuth”).

Scroll down to add the following:
-
Authorized JavaScript Origins → Enter your homepage URL (e.g.,
https://yourdomain.com) -
Authorized Redirect URL → Enter your learner URL (e.g.,
https://yourdomain.com/learn) - Click Create.

A popup will appear with your Client ID and Client Secret.
-
Copy these and keep them safe. You’ll need the Client ID later.

Step 6: Create an API Key
-
While still in the Credentials section, click Create Credentials again.
-
Select API Key.

A popup will appear showing your API Key.
-
Copy this and keep it safe as well.

Step 7: Add the Credentials in Learnyst
Now that you have both credentials:
-
Go back to your Batch Settings in Learnyst.
-
Paste the Client ID and API Key in the respective fields.
-
Click Save.

That’s it! You have successfully enabled Google Calendar integration for your batch.
