Every student is different. They have different needs, dreams, and desires.
For some, it could be to top the math paper whereas for others it could be to get 60+ marks.
Despite having different needs, it is possible to find common patterns using an online student registration form. The latest Custom fields can help you do just that.
In this post, let's see how to use the custom fields to create a crisp online student registration form & get to know your students better.
Watch the video or read through the whole steps.
How To Access Custom Fields
-
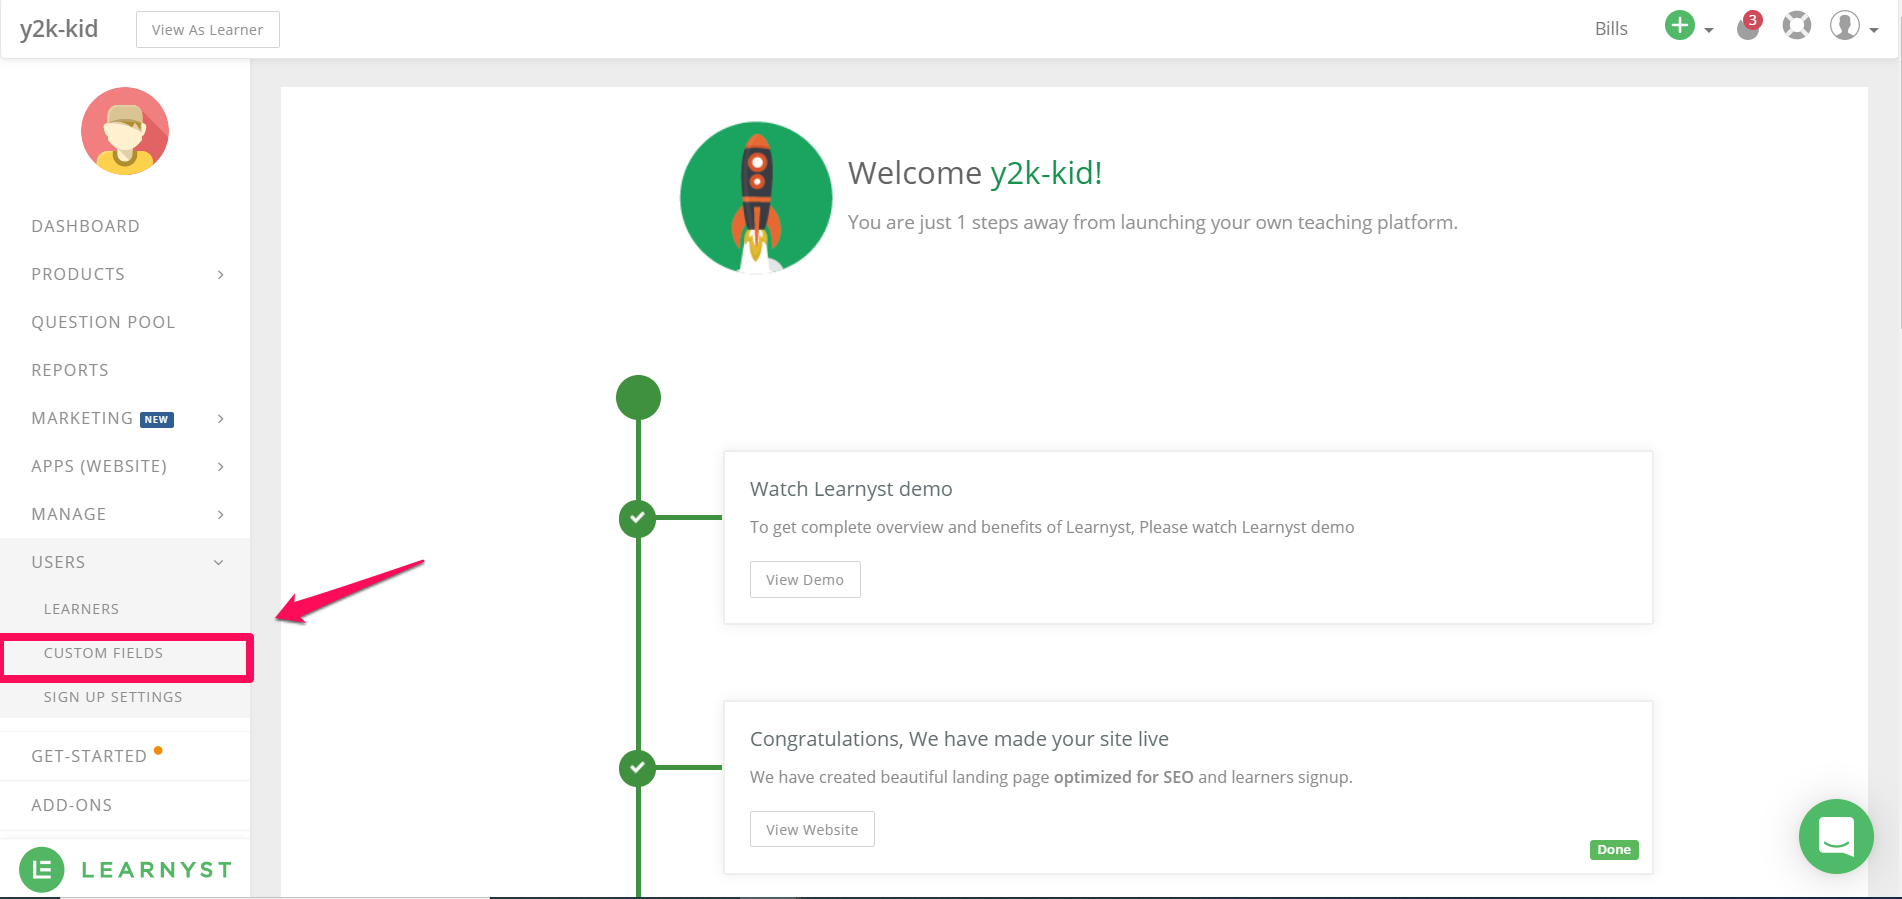
In your admin dashboard, hover over the users tab and click on Custom fields option
In your admin dashboard, hover over the users tab and click on Custom fields option
-
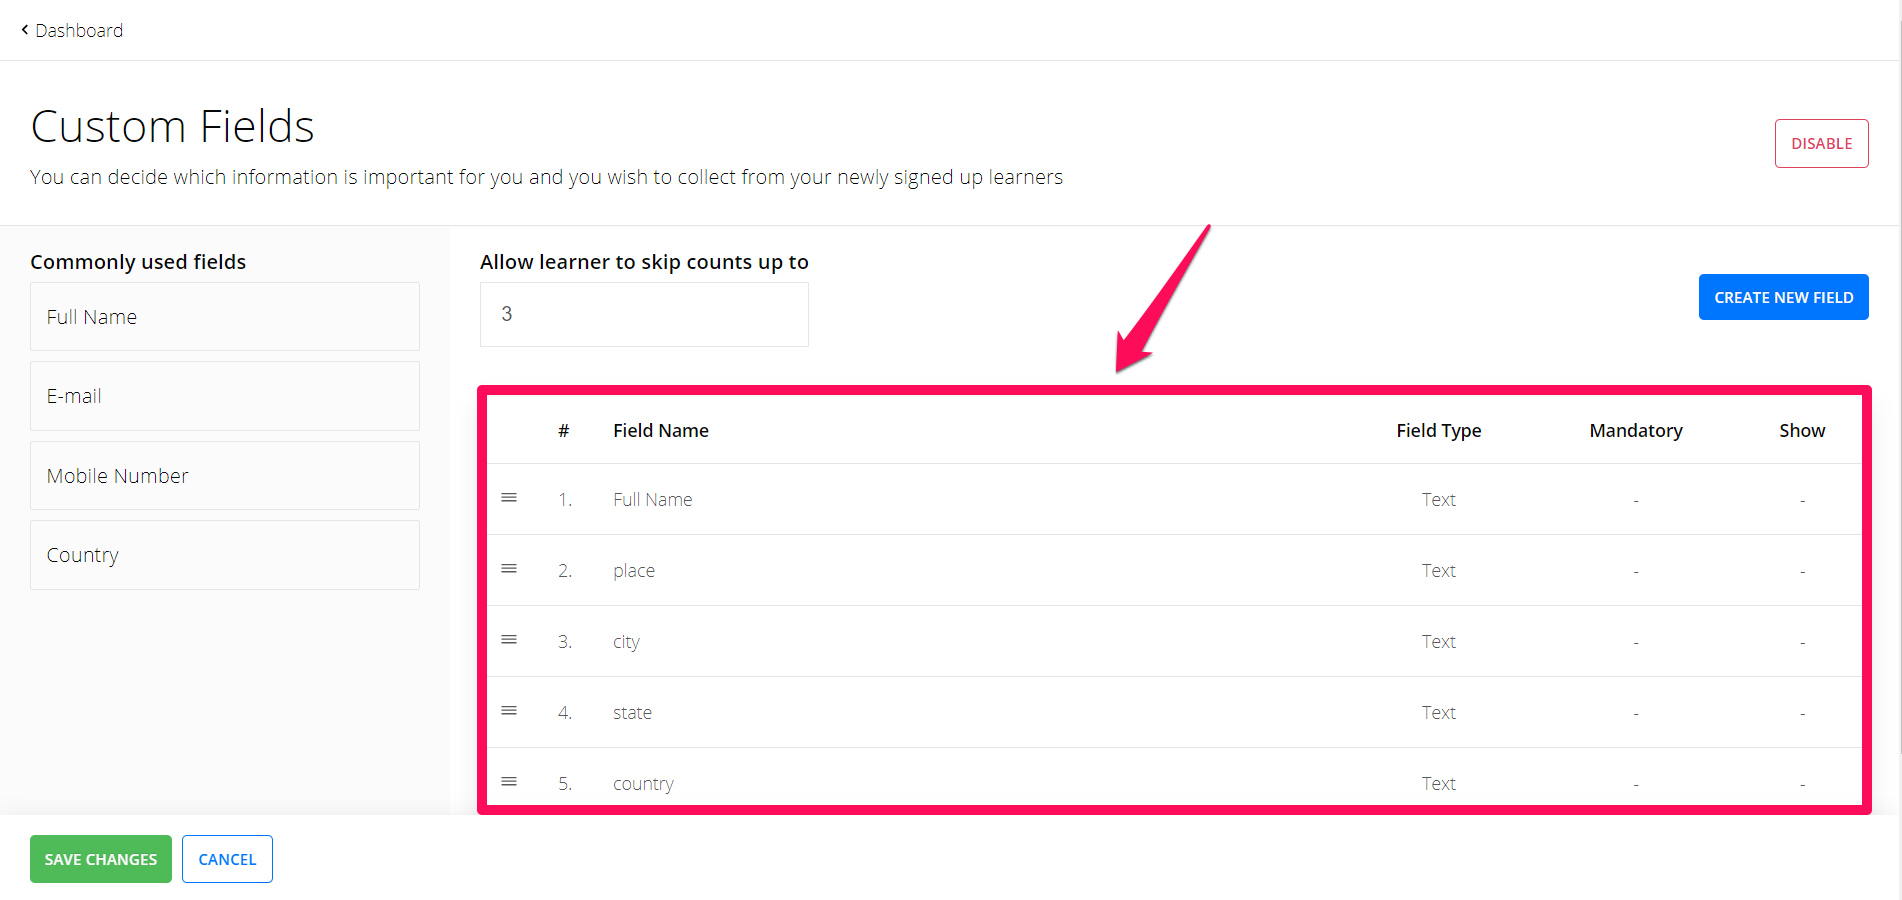
You can now, create your learner's profile, within the custom fields. Full Name, Email, Mobile, Country are the default fields given to you.
You can now, create your learner's profile, within the custom fields. Full Name, Email, Mobile, Country are the default fields given to you.
-
If you don't like what you see, you can always delete or create a new field. Let us see how to do that in the next section.
If you don't like what you see, you can always delete or create a new field. Let us see how to do that in the next section.
Related Post: How to Download Learner Data Using Filters
How to Change or Delete The Existing Fields
-
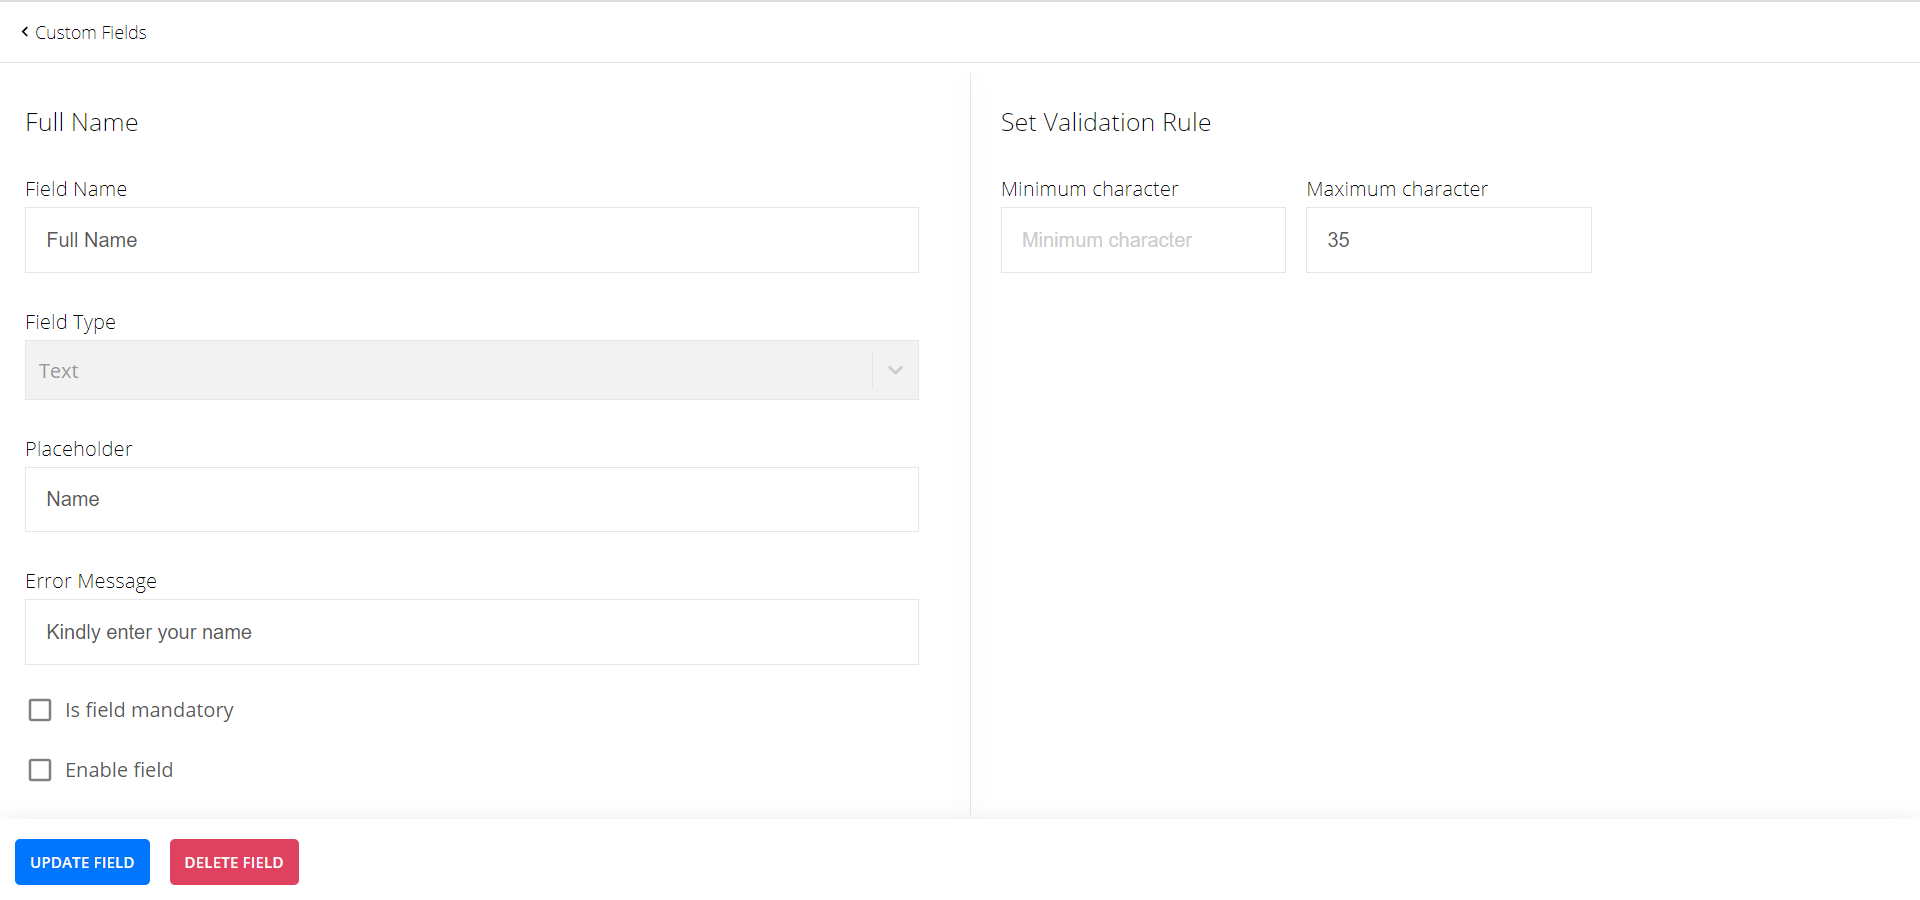
Simply click on a field like for e.g. Full name.
Simply click on a field like for e.g. Full name.
-
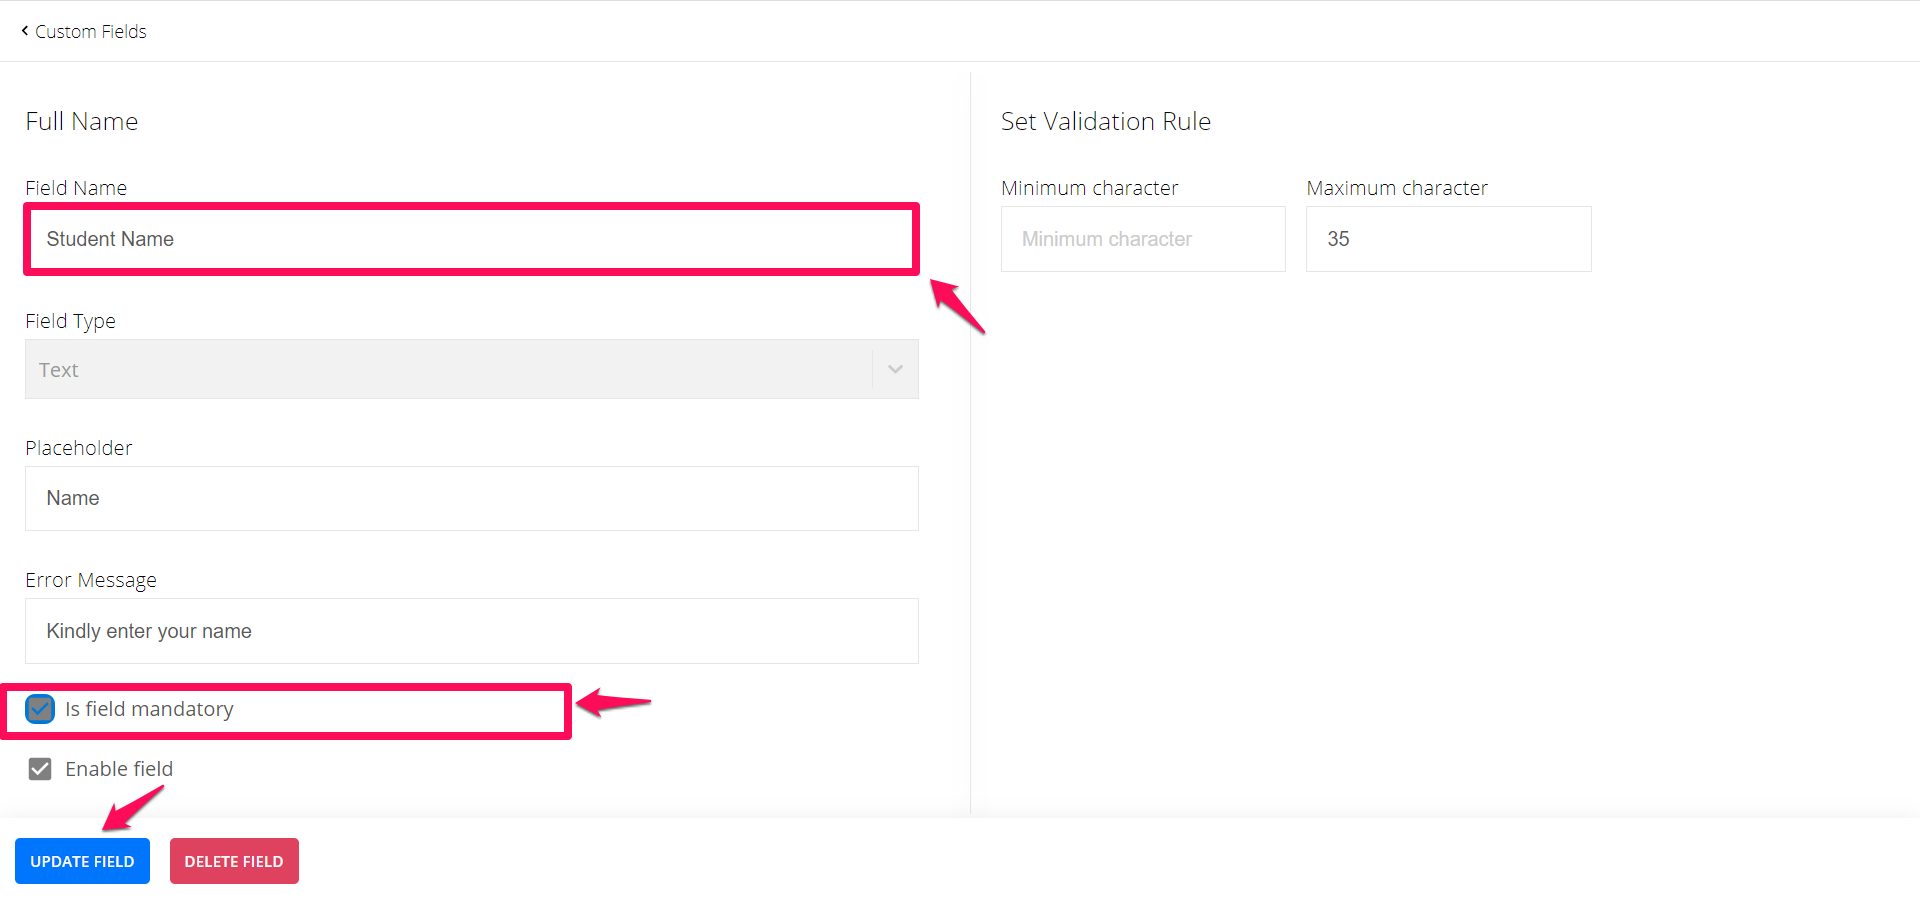
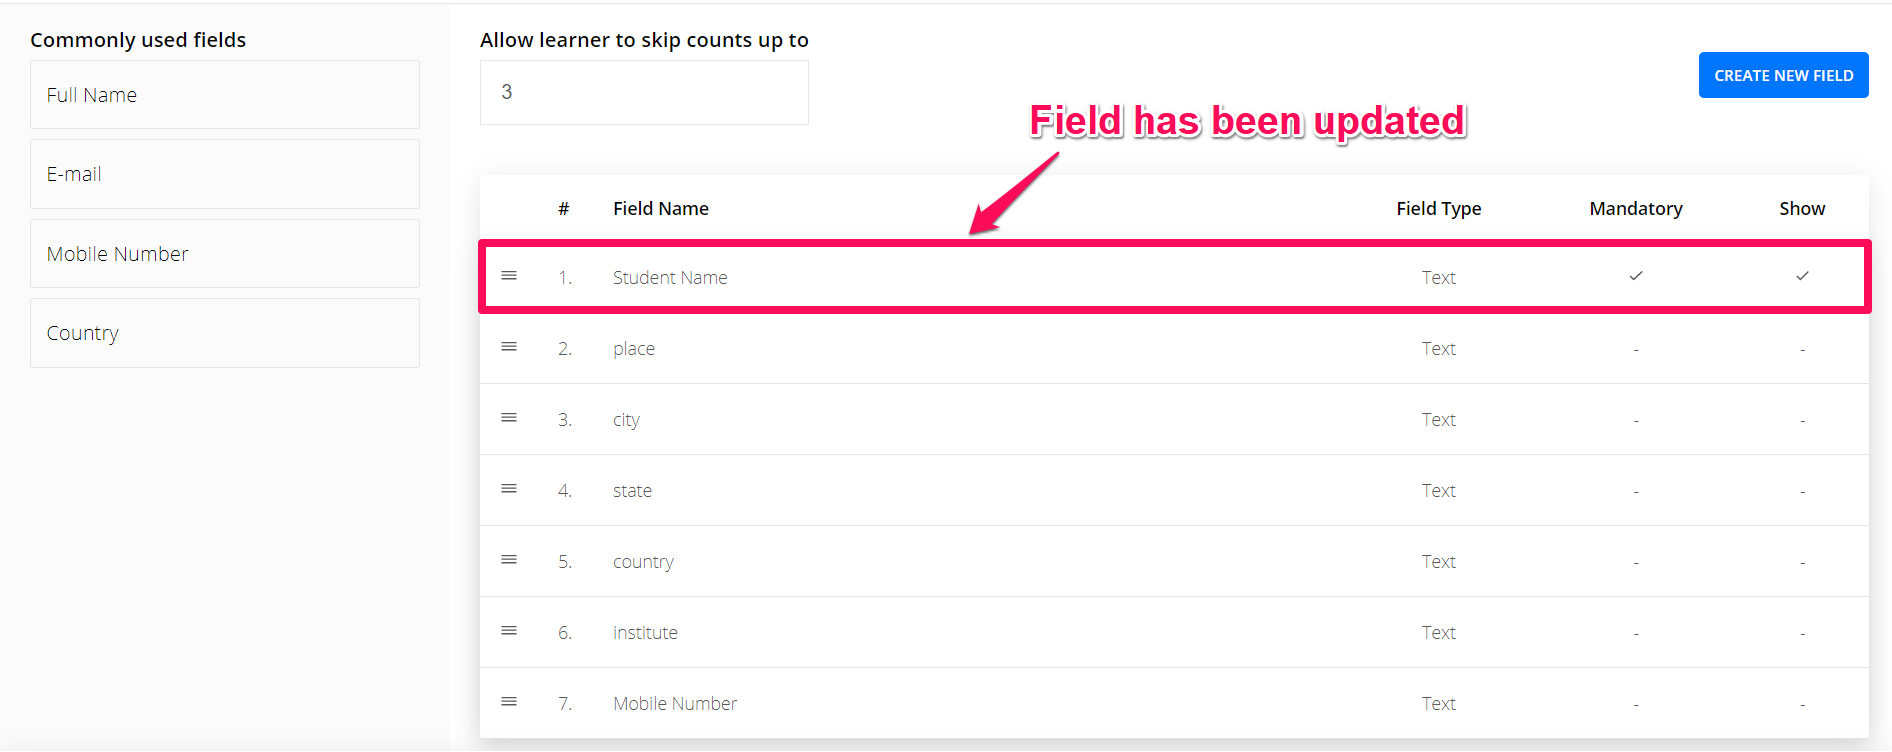
Within this screen make the required changes. For e.g. Change the field name from Full Name to Student Name and select the is field mandatory option.
Within this screen make the required changes. For e.g. Change the field name from Full Name to Student Name and select the is field mandatory option.
-
Click update to update the changes.
Click update to update the changes.

-
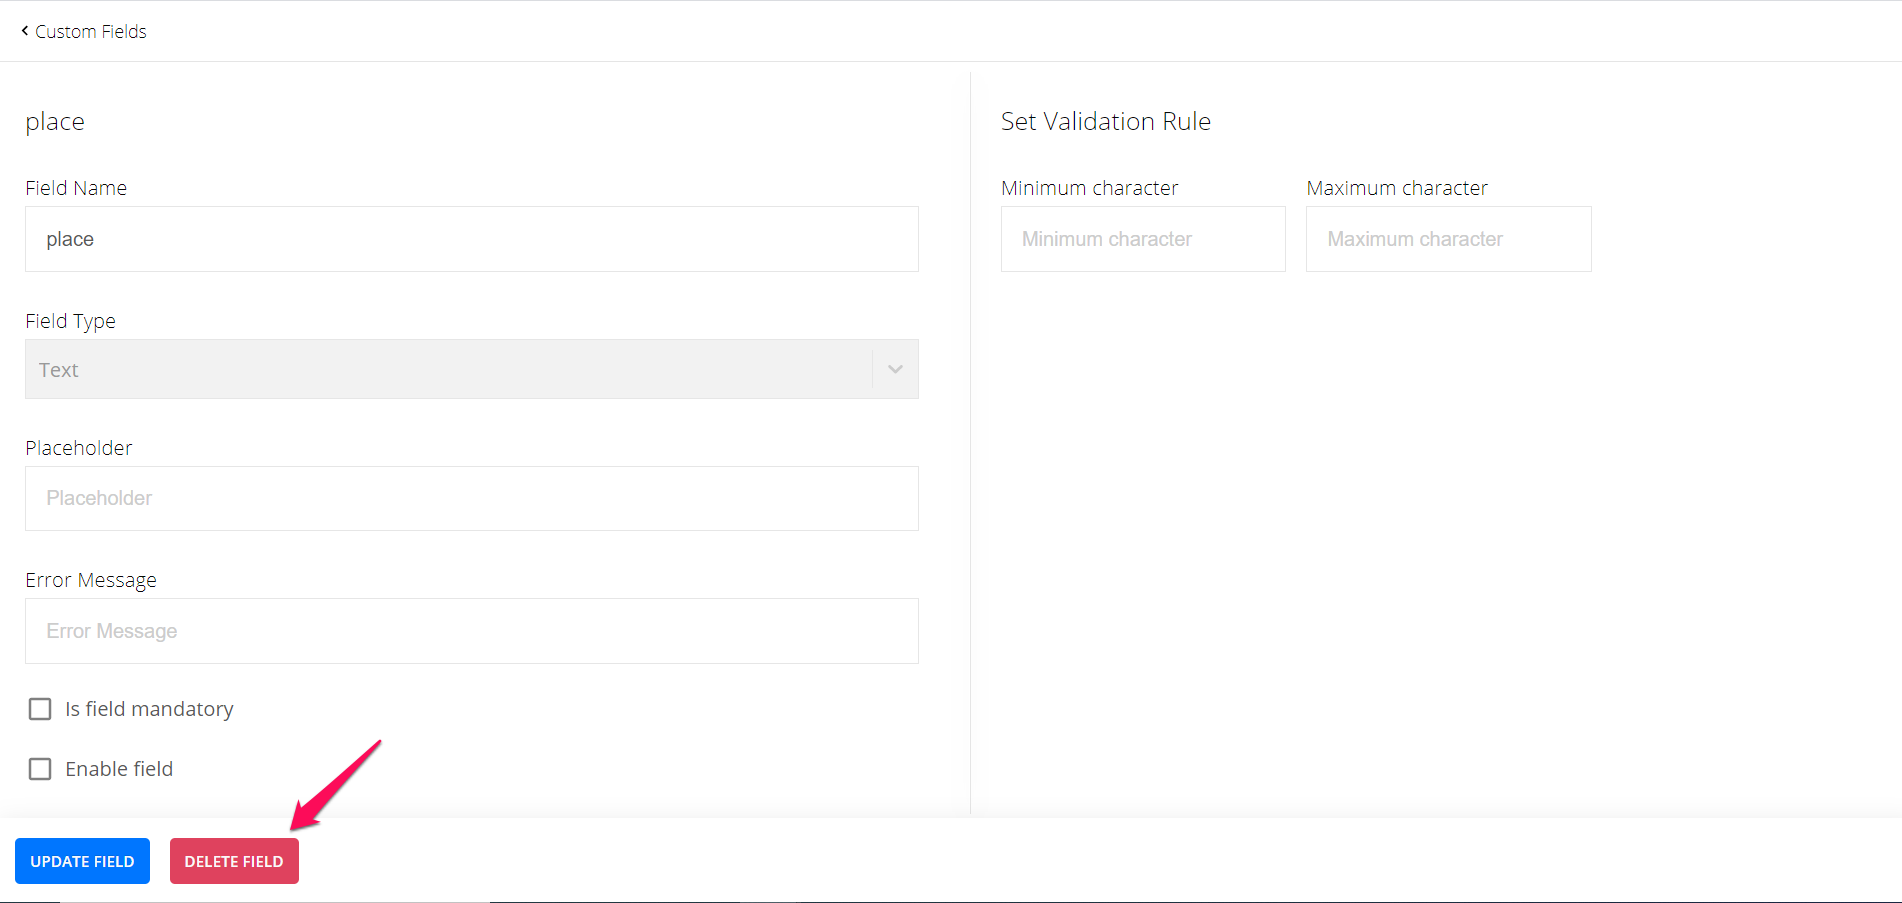
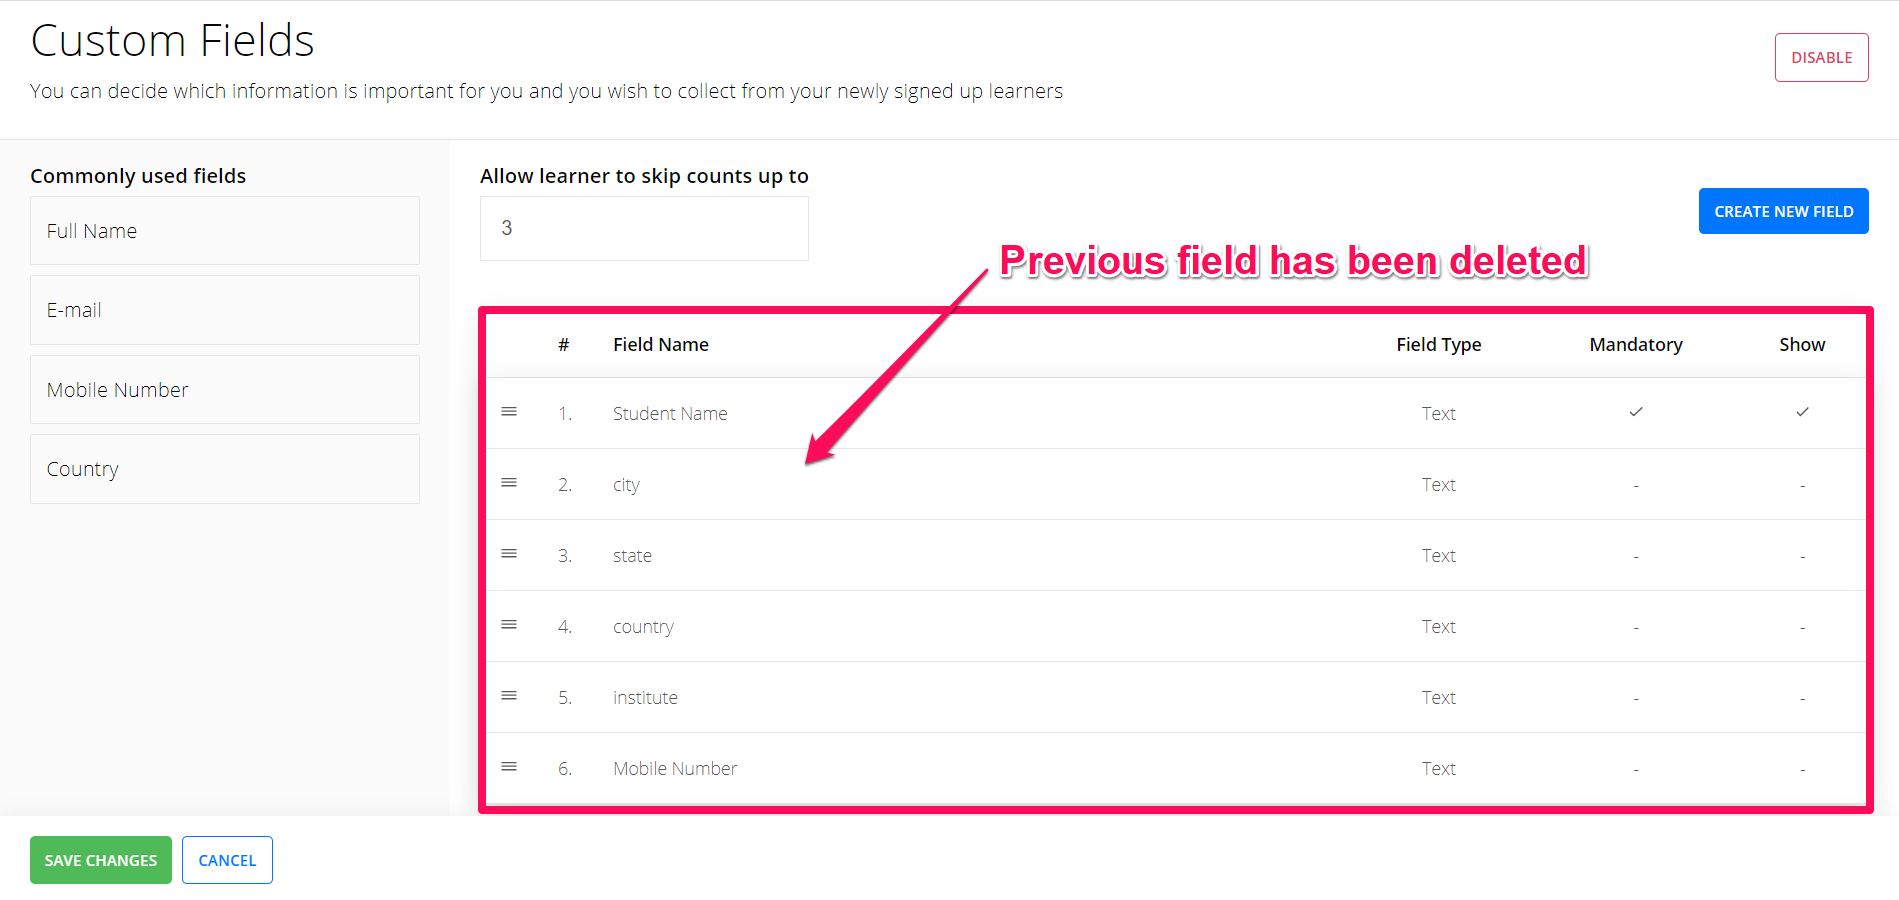
To delete these changes, select the Delete Field Option instead. For e.g. I am deleting the Place field.
To delete these changes, select the Delete Field Option instead. For e.g. I am deleting the Place field.
-
In the next section, let us see how to add existing and new custom fields to your student profile.
In the next section, let us see how to add existing and new custom fields to your student profile.
Related Post: How to merge learner data using VLookup
How To Add Existing Fields In Your Student Profile
-
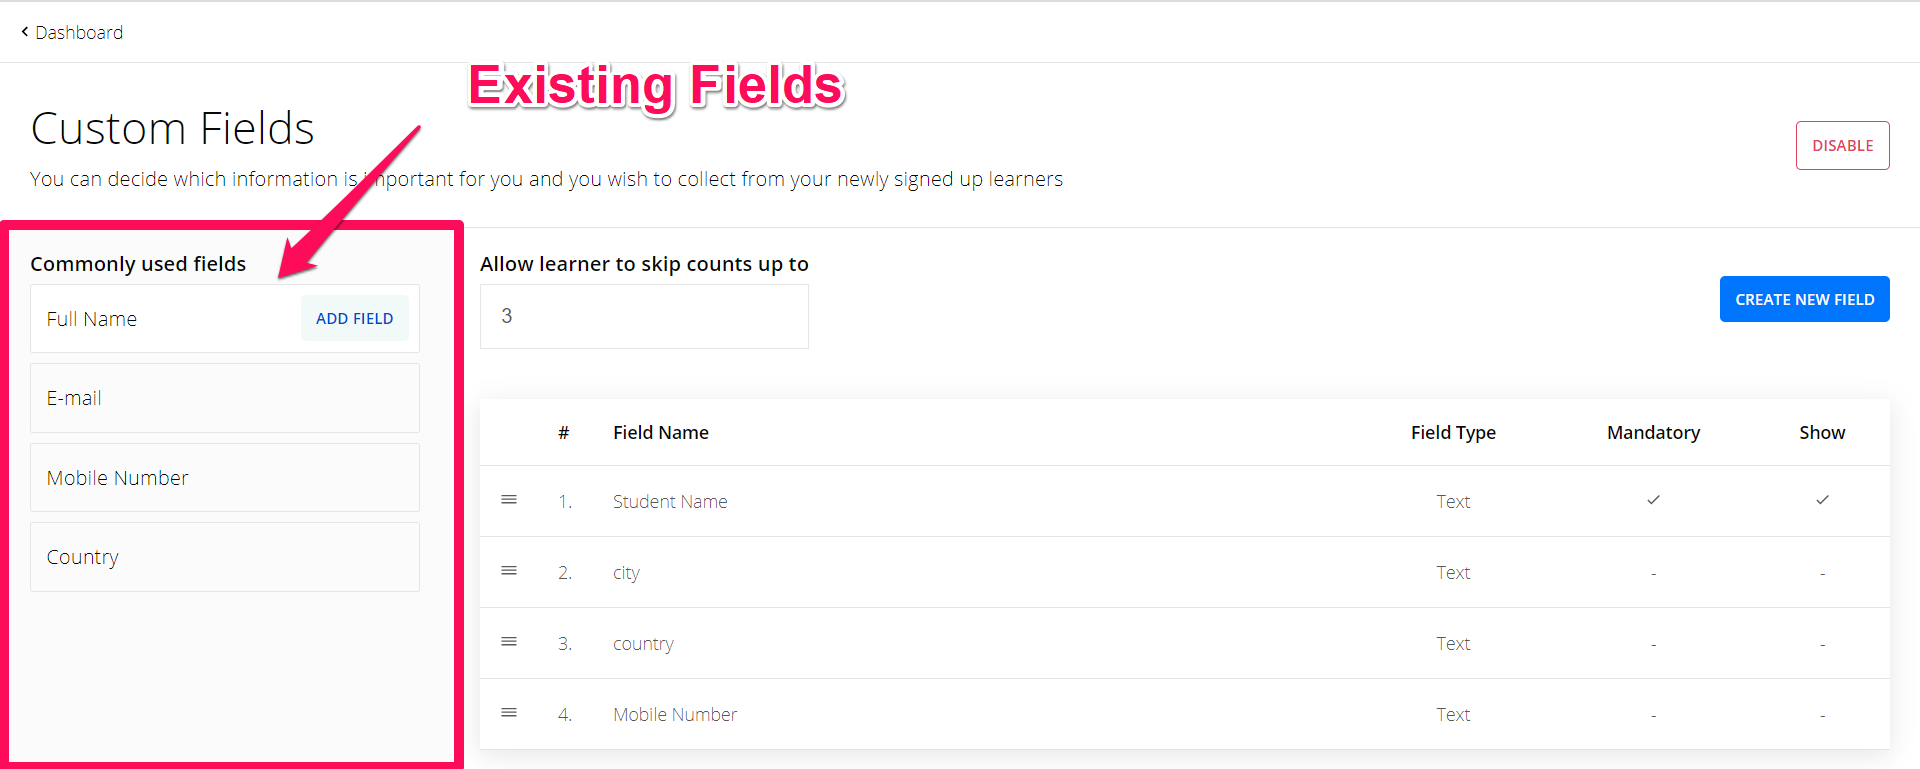
You can add existing custom fields from the left-hand side of your screen.
You can add existing custom fields from the left-hand side of your screen.
-
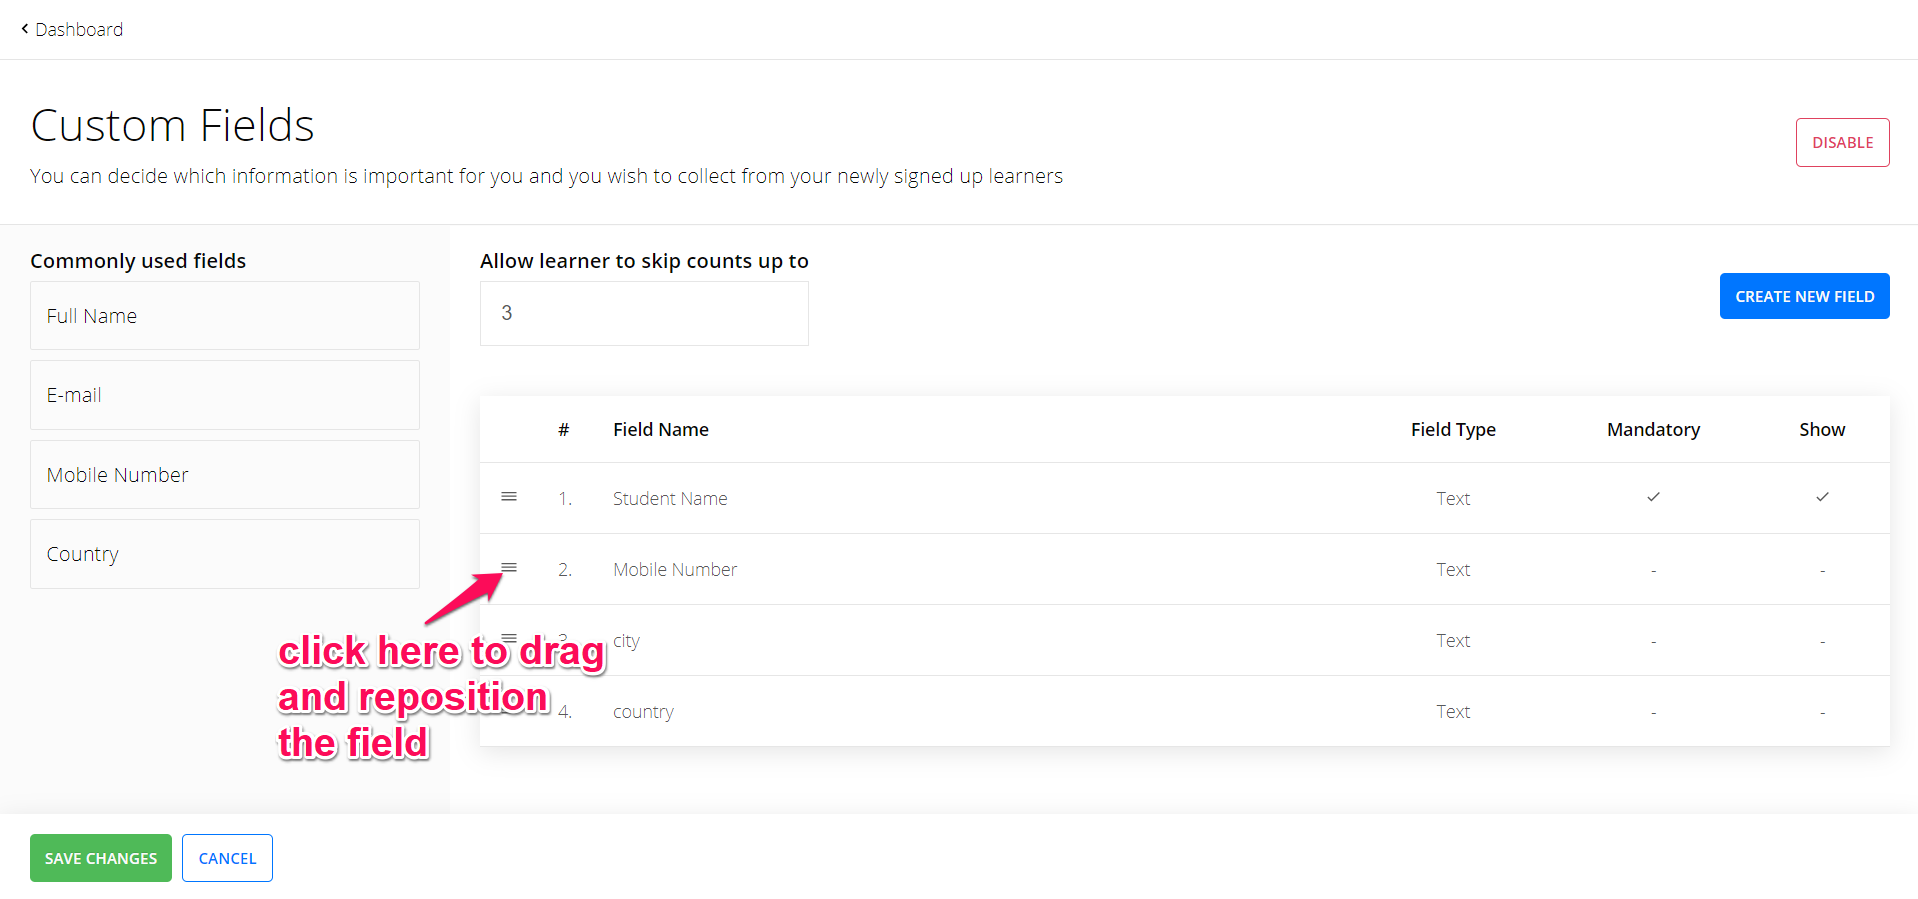
So, fields like full name, email id, mobile number, country are the existing fields. You can always reposition the fields by clicking this symbol and dragging them.
So, fields like full name, email id, mobile number, country are the existing fields. You can always reposition the fields by clicking this symbol and dragging them.
-
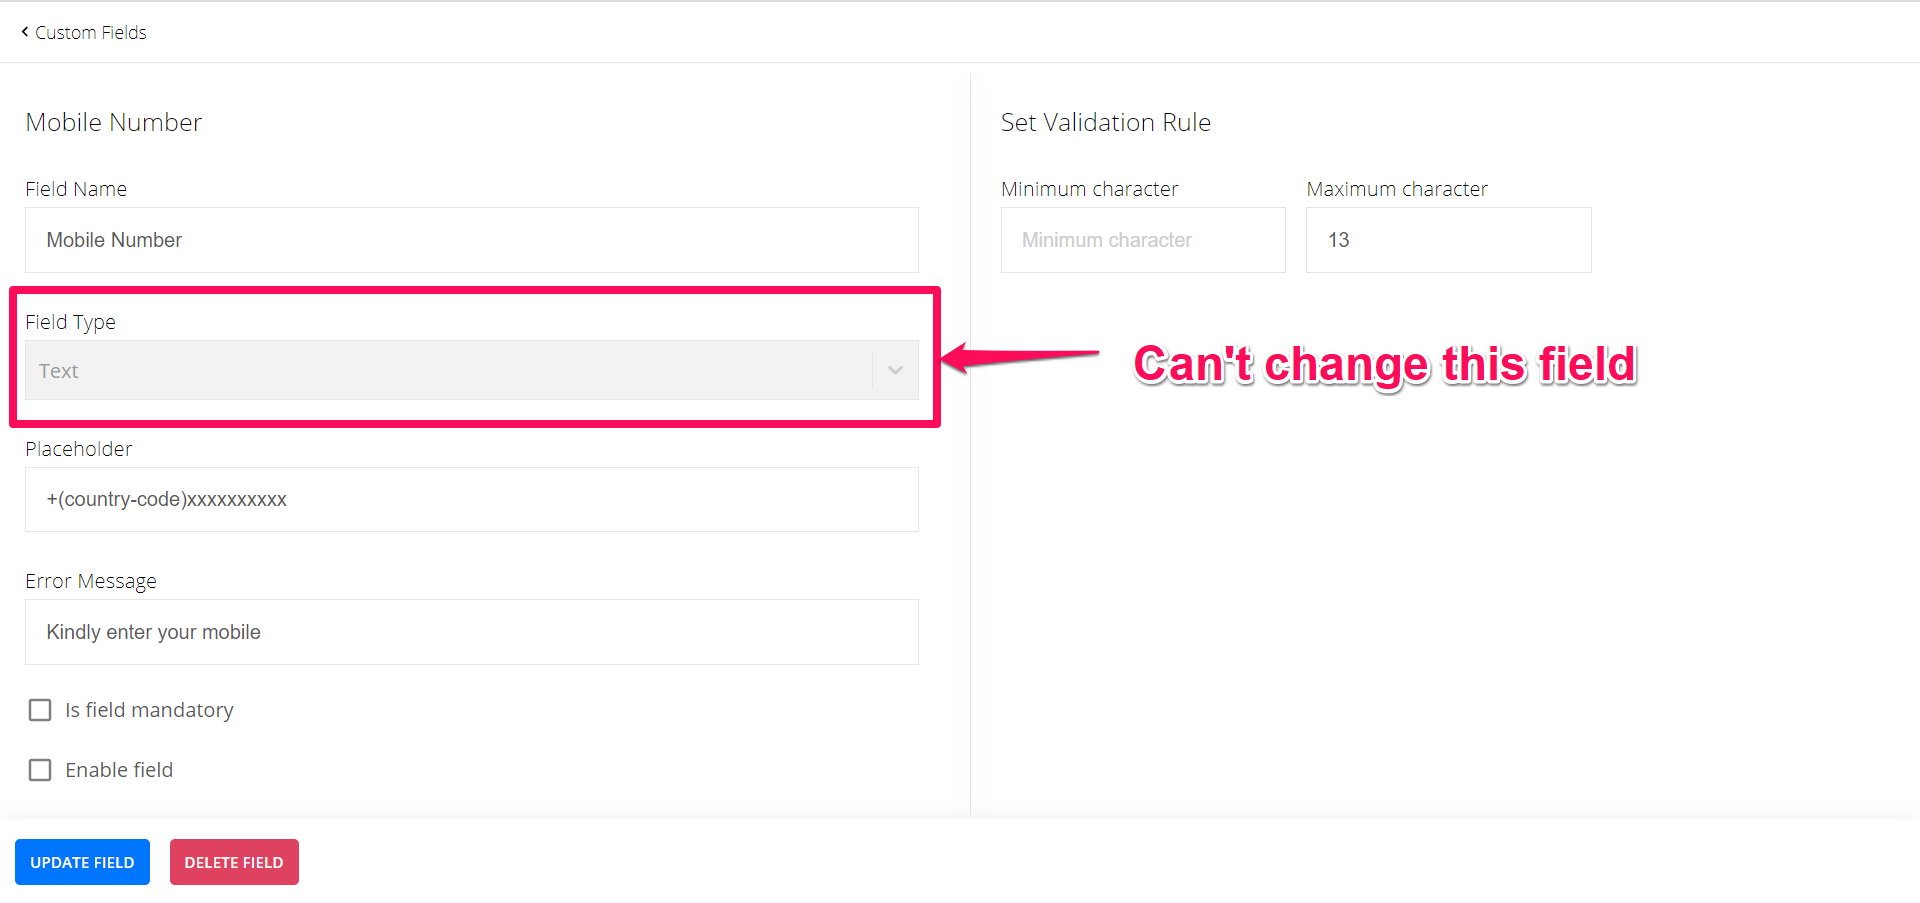
You can't change the field type of the existing fields.
You can't change the field type of the existing fields.
-
So, if you want to be able to change the field types suiting your needs, you should use custom fields.
So, if you want to be able to change the field types suiting your needs, you should use custom fields.
How To New Custom Fields In Your Student Profile
-
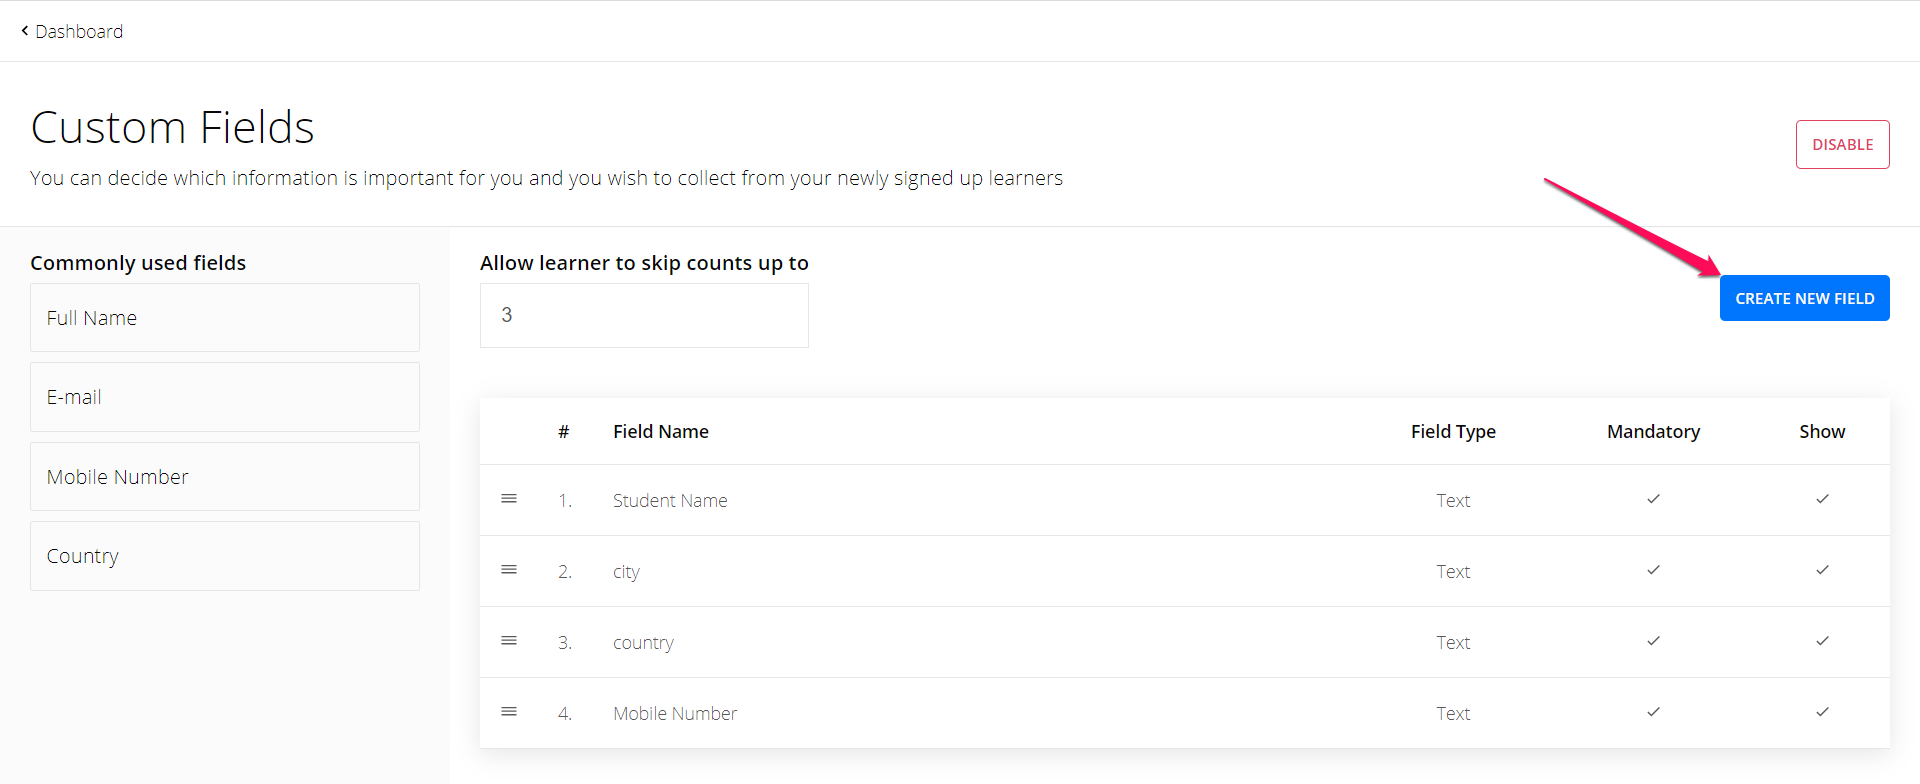
To create a new custom field, click on the custom field button on the right side.
To create a new custom field, click on the custom field button on the right side.
For e.g. Let us say I sell programming courses, I want to know why students it.
-
Is it to get a job?
-
Or passing an exam?
Is it to get a job?
Or passing an exam?
To know this, I create a custom field called student goal. And I can choose any of the 4 data types.
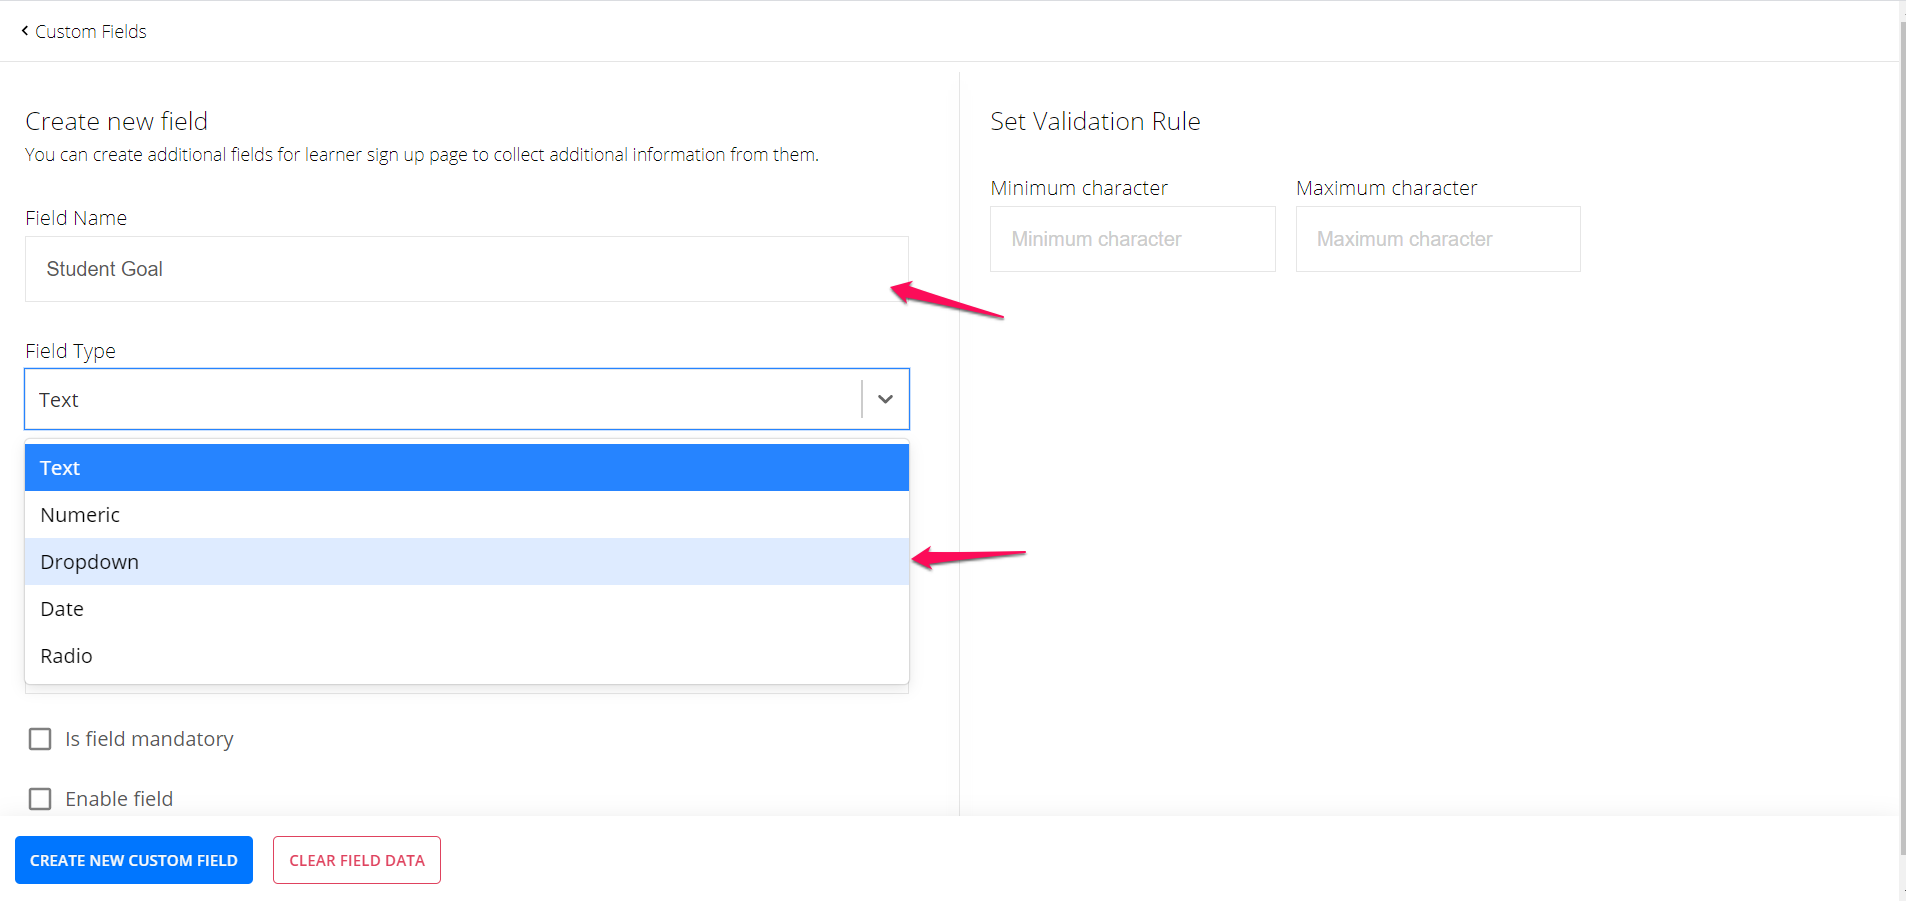
Here are the 4 field types
-
Text: Student will write something like " I want this course for getting a job"
-
Dropdown: Student can pick options from a drop-down
-
Date: A date field will appear
-
Radio: Student will choose an answer like "yes" or "no"
Text: Student will write something like " I want this course for getting a job"
Dropdown: Student can pick options from a drop-down
Date: A date field will appear
Radio: Student will choose an answer like "yes" or "no"
-
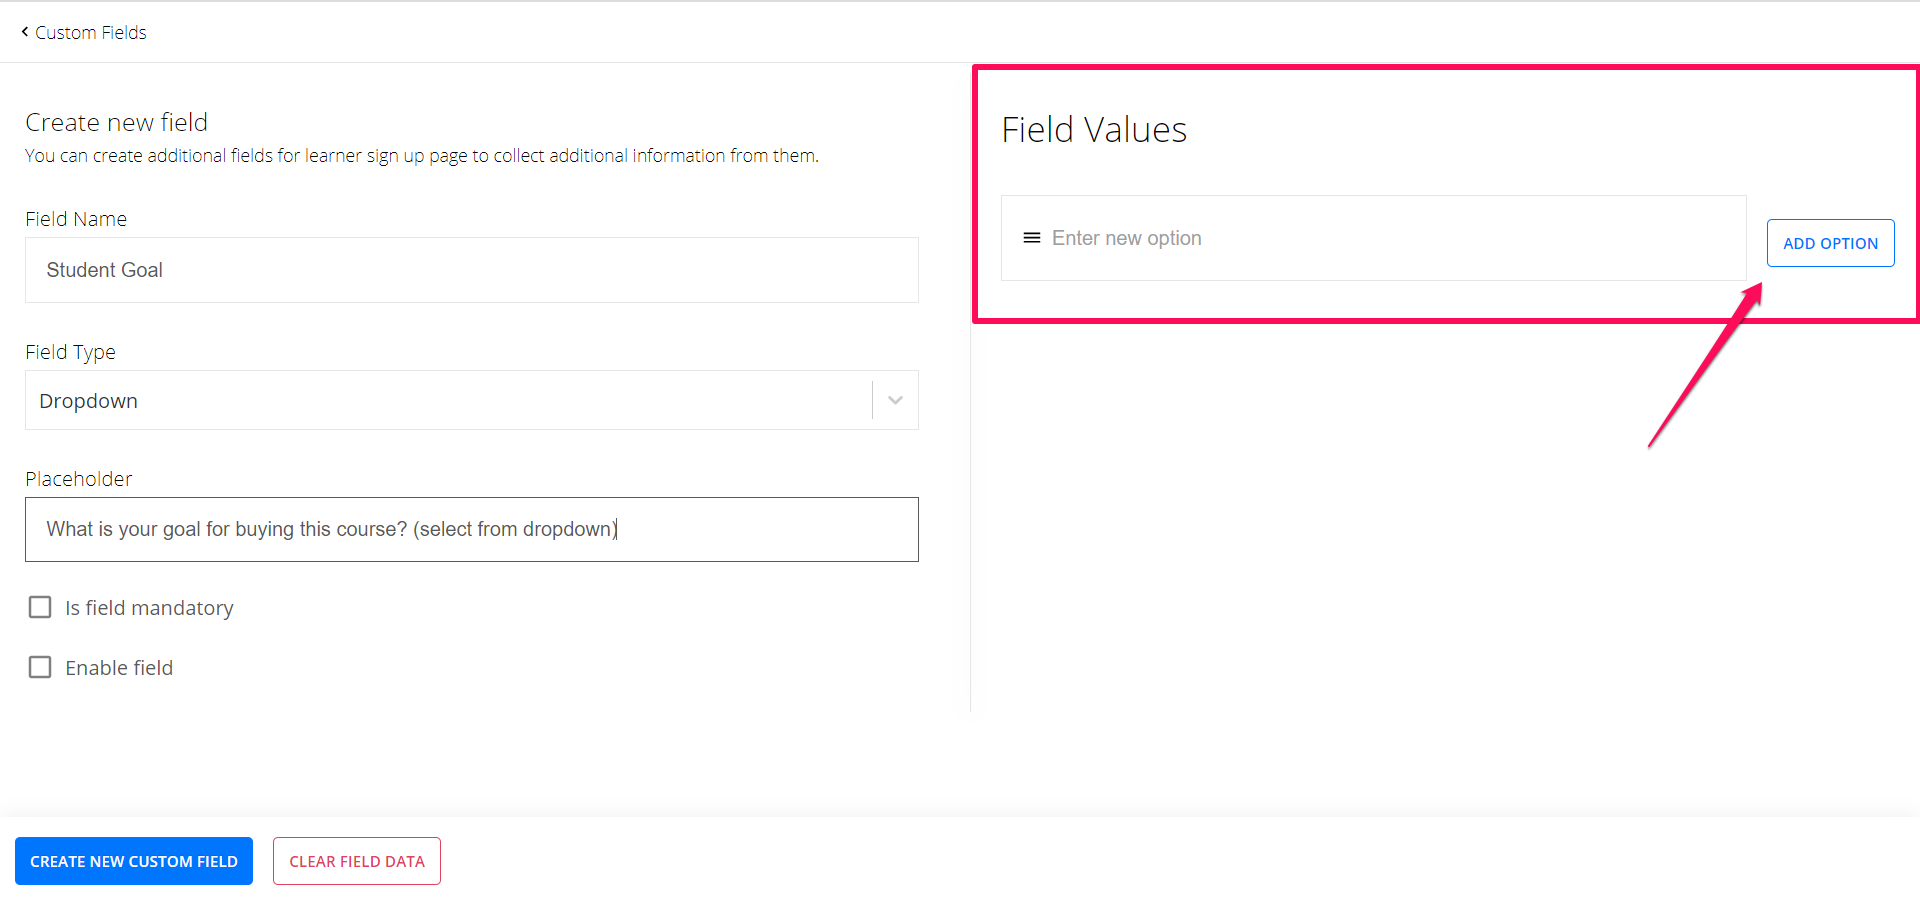
For this example, I am picking the dropdown option. To add options, use the add option on the right side
For this example, I am picking the dropdown option. To add options, use the add option on the right side
-
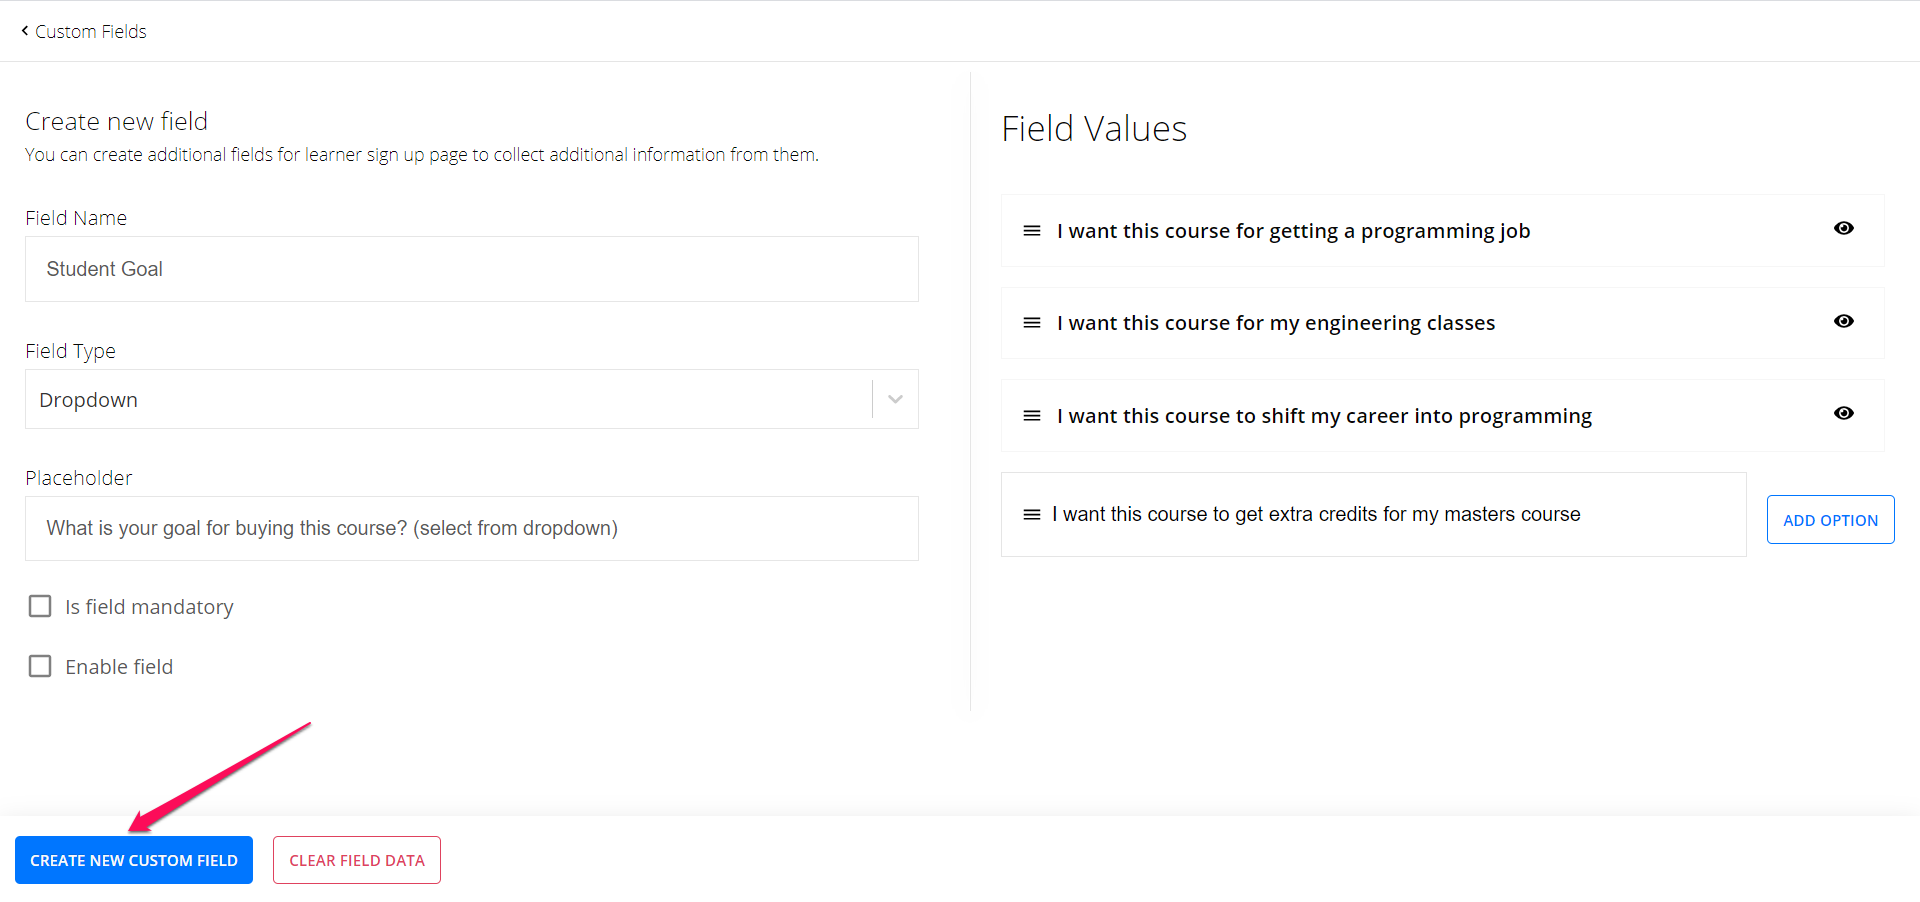
Give students the options and click the create new custom field option
Give students the options and click the create new custom field option
-
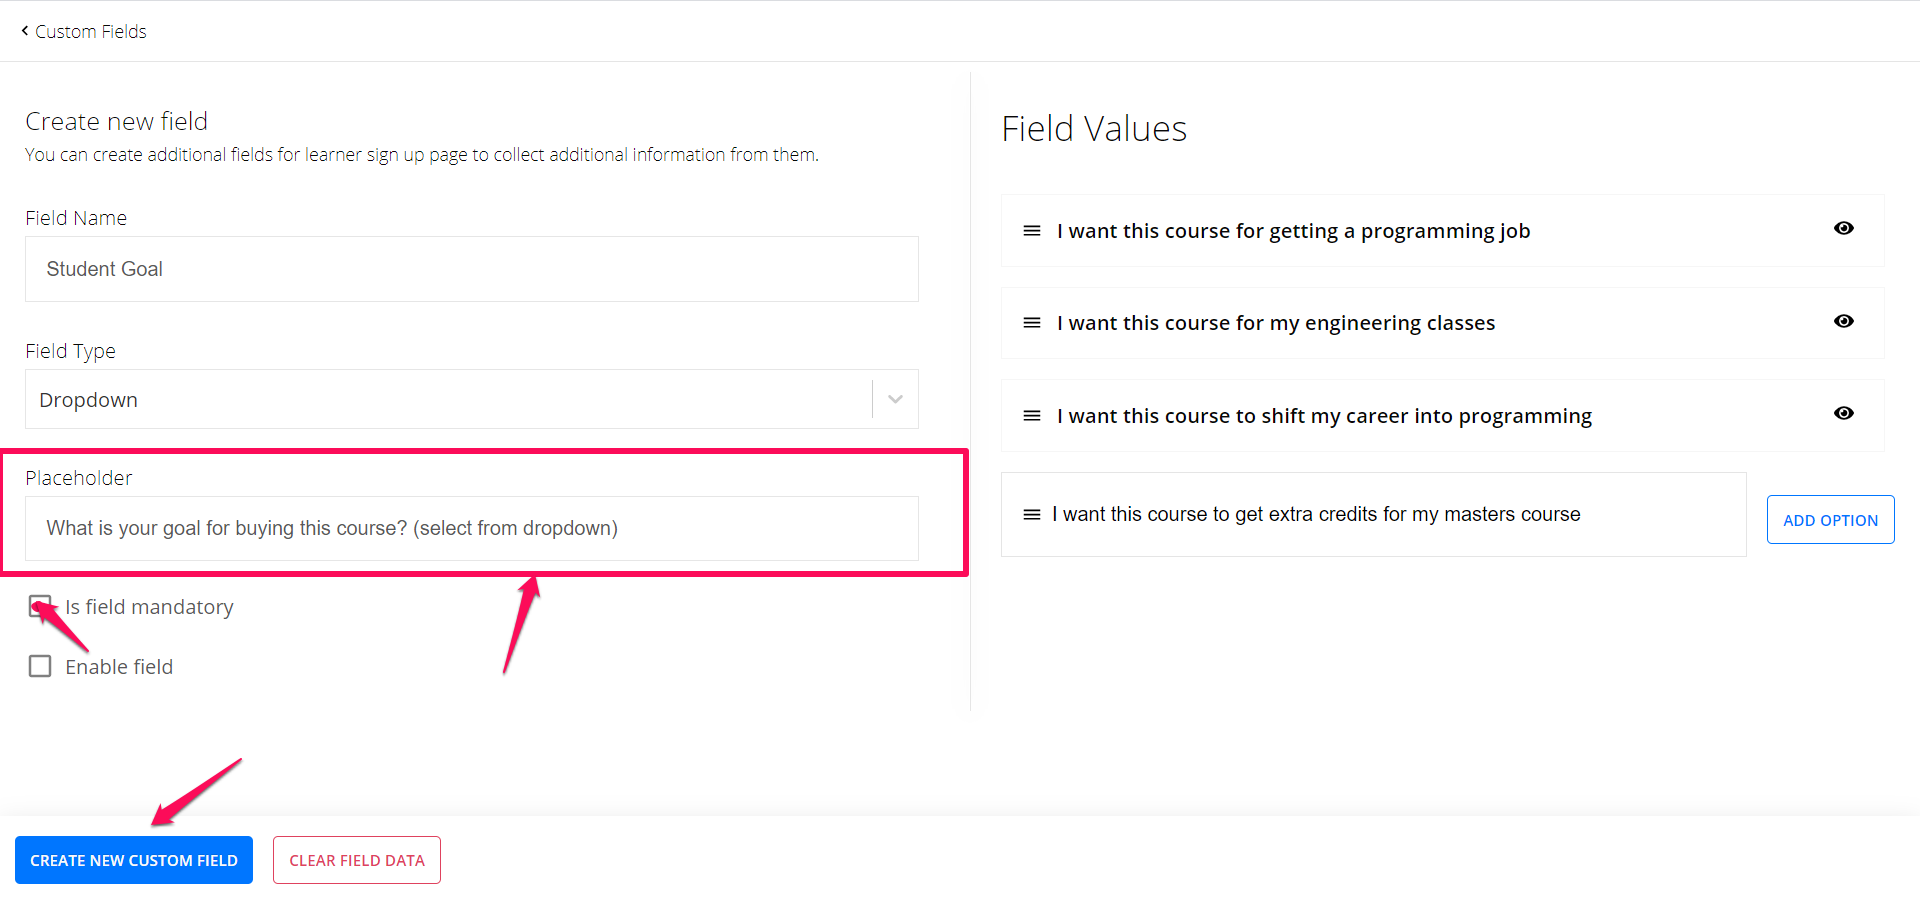
Give a suitable placeholder ( the text that will tell your students what this field is about). Select Is Field mandatory and clicks on Create New Custom Field
Give a suitable placeholder ( the text that will tell your students what this field is about). Select Is Field mandatory and clicks on Create New Custom Field
-
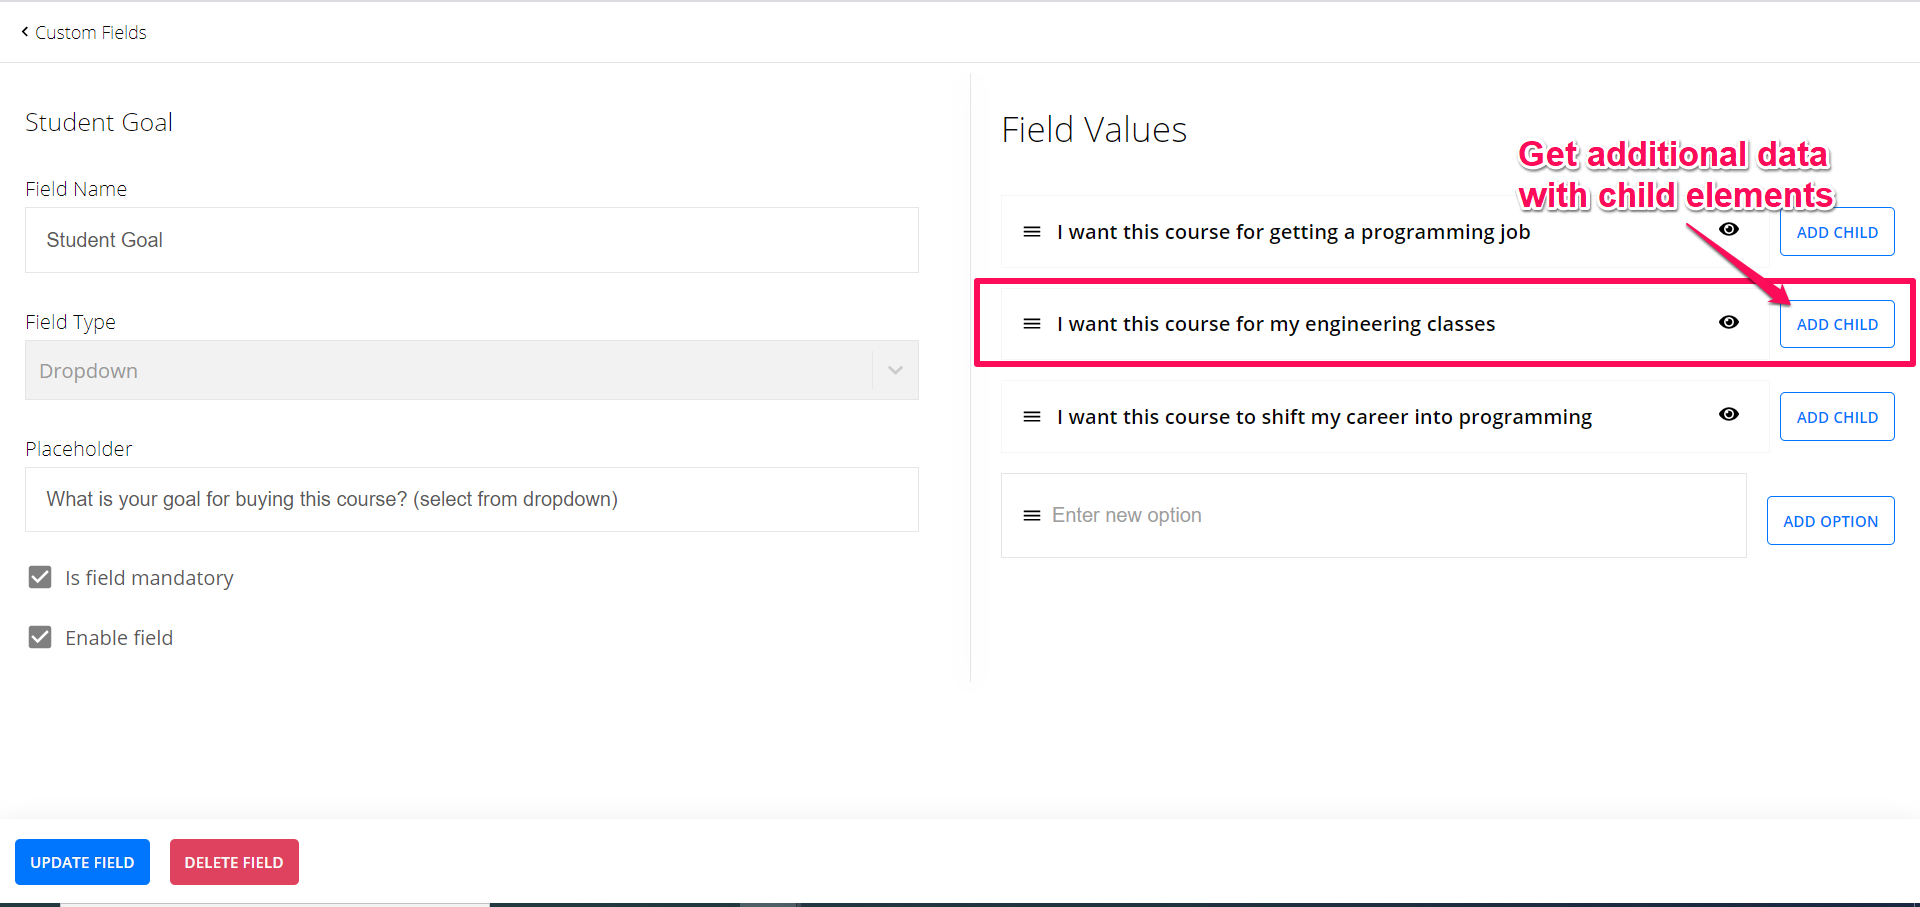
You can go a step further in collecting data by adding child elements.
You can go a step further in collecting data by adding child elements.
-
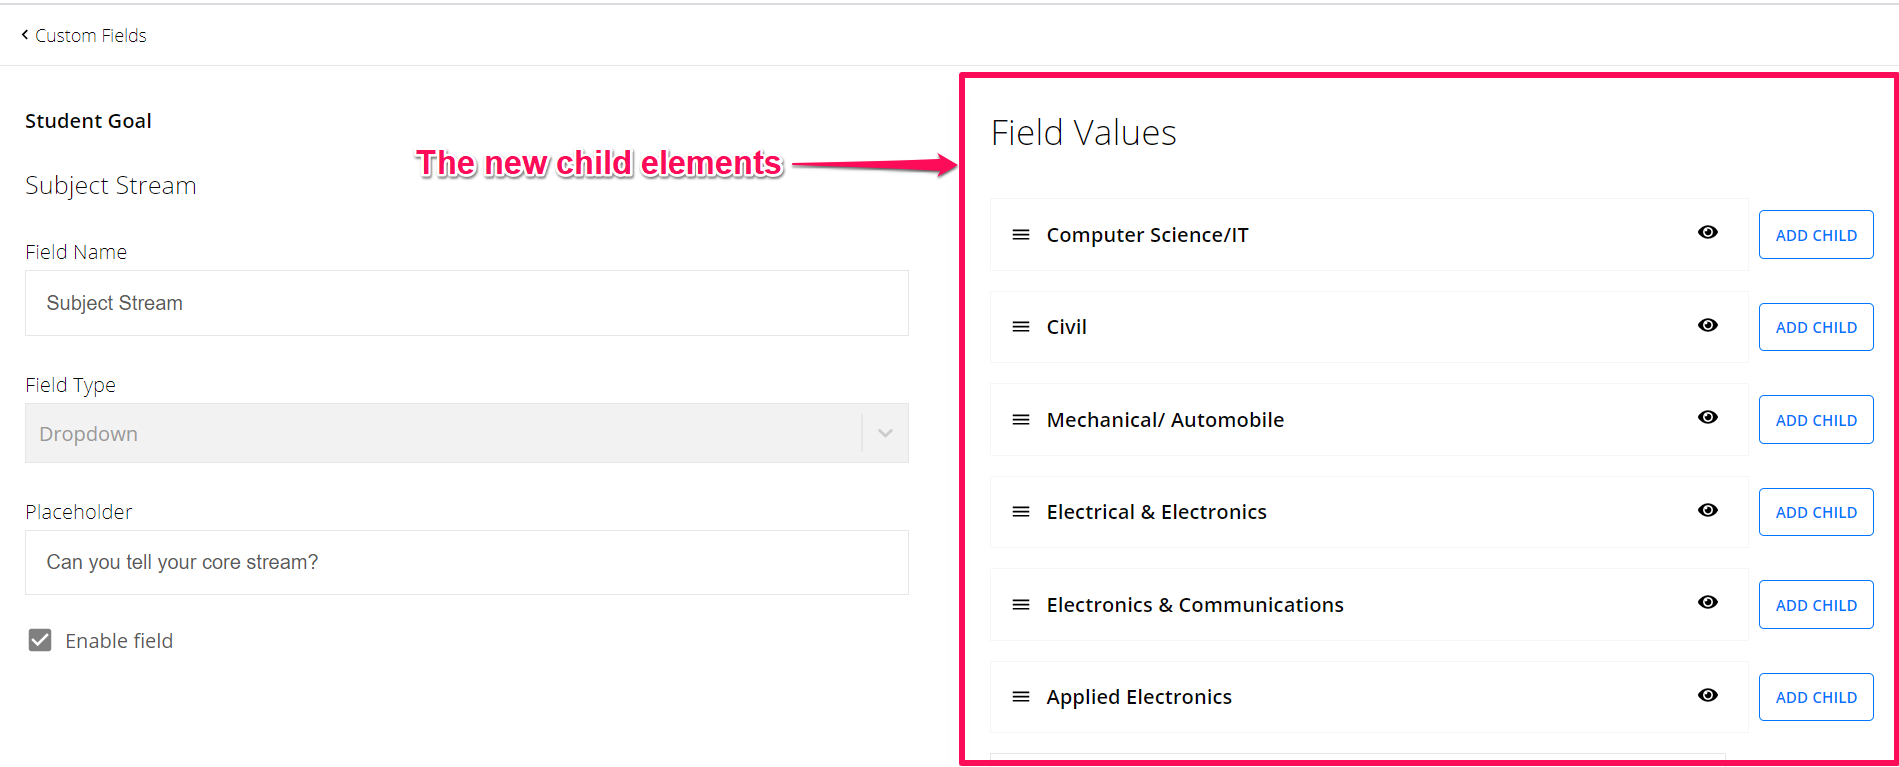
For e.g. If I want to know which engineering stream students are most likely to buy my course, I can create a child element like this.
For e.g. If I want to know which engineering stream students are most likely to buy my course, I can create a child element like this.
Make Your Profile Builder Mandatory
-
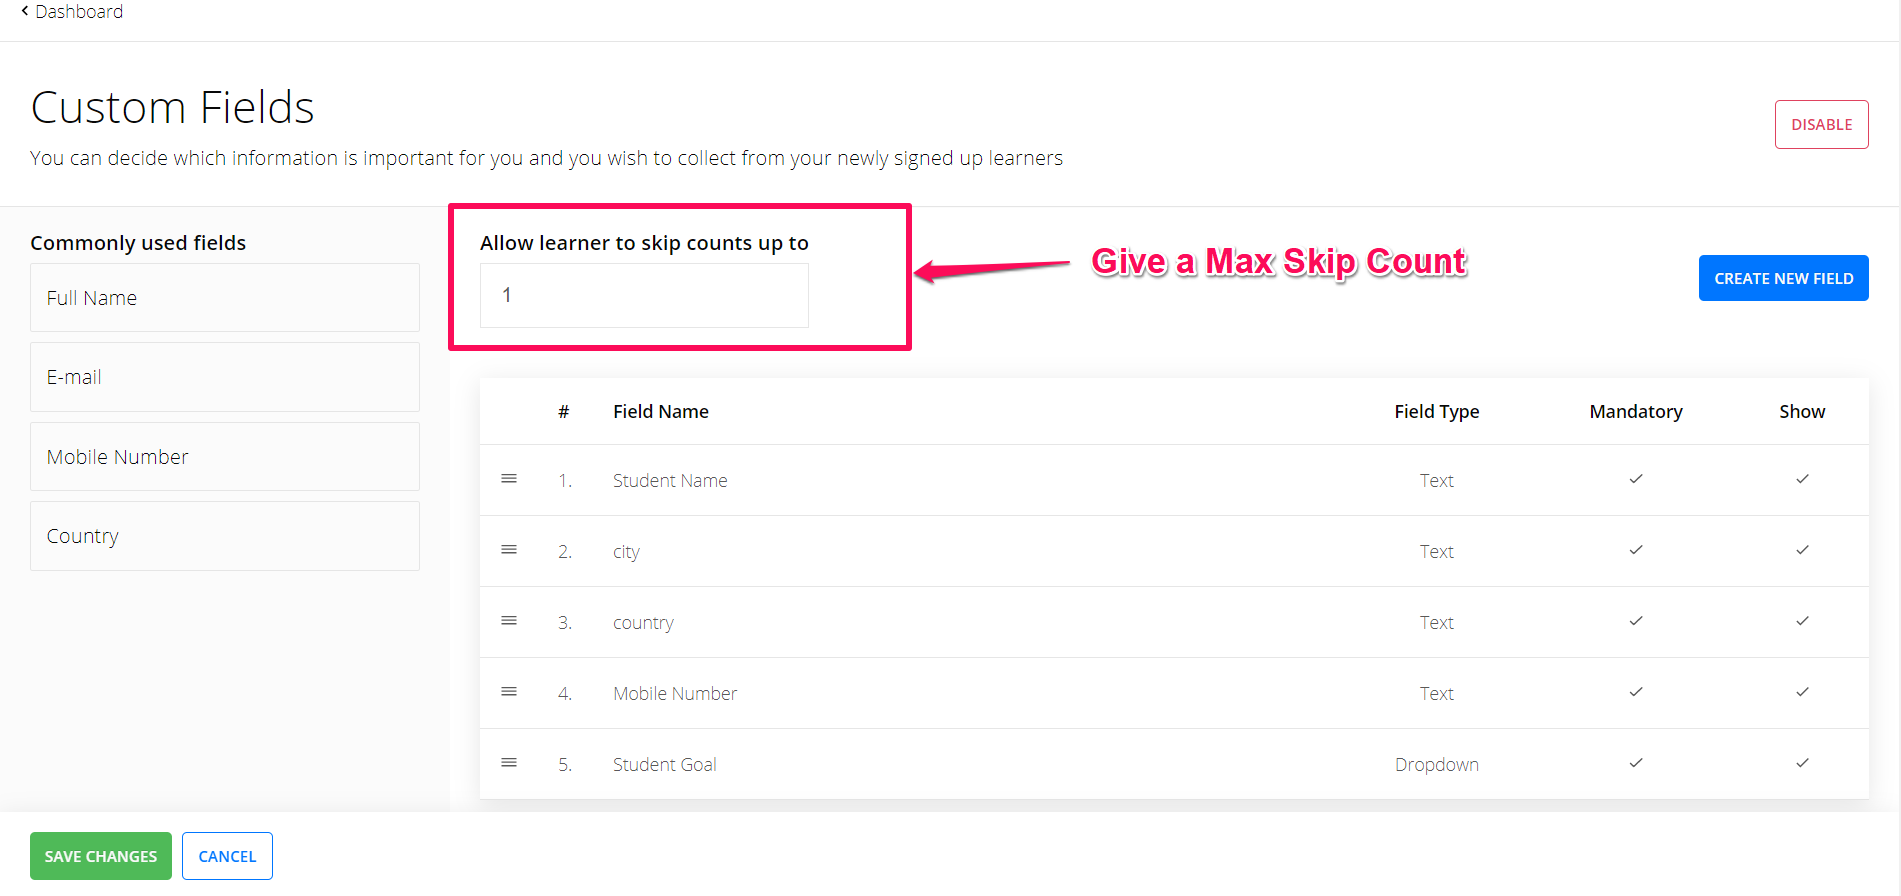
After you are done creating all the fields, you can set up the maximum number of times, your students can skip your profile builder question.
After you are done creating all the fields, you can set up the maximum number of times, your students can skip your profile builder question.
-
Mandating this will allow only serious students to stick with your course. This means, the next time you market your courses to these students, they are most likely to buy them.
Mandating this will allow only serious students to stick with your course. This means, the next time you market your courses to these students, they are most likely to buy them.
Conclusion
-
With this new profile builder, you categorize your students & send targeted messages to them. You can download the learner details from the report section
With this new profile builder, you categorize your students & send targeted messages to them. You can download the learner details from the report section

-
So, now go ahead and create learners' profiles and use them for marketing purposes. Expand your student's base and grow online by teaching.
So, now go ahead and create learners' profiles and use them for marketing purposes. Expand your student's base and grow online by teaching.
For more resources on marketing check the below resources
-
Blog: Visit blog.learnyst.com
-
Course Marketing: How to market your courses
-
Course Creation: How to create an online course in 6 easy steps
Blog: Visit blog.learnyst.com
Course Marketing: How to market your courses
Course Creation: How to create an online course in 6 easy steps
Did this answer your question? Thanks for the feedback There was a problem submitting your feedback. Please try again later.Yes No No results found-Jun-10-2024-01-31-39-4468-PM.png?height=120&name=Learnyst%20logo%20(2)-Jun-10-2024-01-31-39-4468-PM.png)