
Using the App builder, you can build your own branded Android or iOS mobile apps from your academy's dashboard, without needing a developer's help.
Note:
-
Before building your apps, map your custom domain to your Learnyst account. App builder works only if you have mapped your custom domain.
-
Also, make sure that you have published at least 1 course or test in your academy
In this article, let's see the steps to build your android apps from the App builder. Let's start.
-
Activate your App Builder Subscription
-
Build an Android app (without security)
-
Create Your App name & Bundle Id
-
Disable Your Apps Security
-
Create JSON File & Security Key
-
Upload App Graphics & Images
-
Build Your App & Download the APK
-
-
Install the APK On Your Phone
-
Build an Android App (with security enabled)
-
Create your Playstore Developer account
-
Create your app on your Playstore Developer account
-
Create your app
-
Add the Privacy Policy URL
-
Add Data Safety details
-
Enter App Category and Contacts
-
Upload Your App Creatives
-
-
Publish Your Android App
#1. Activate Your App Builder Subscription
-
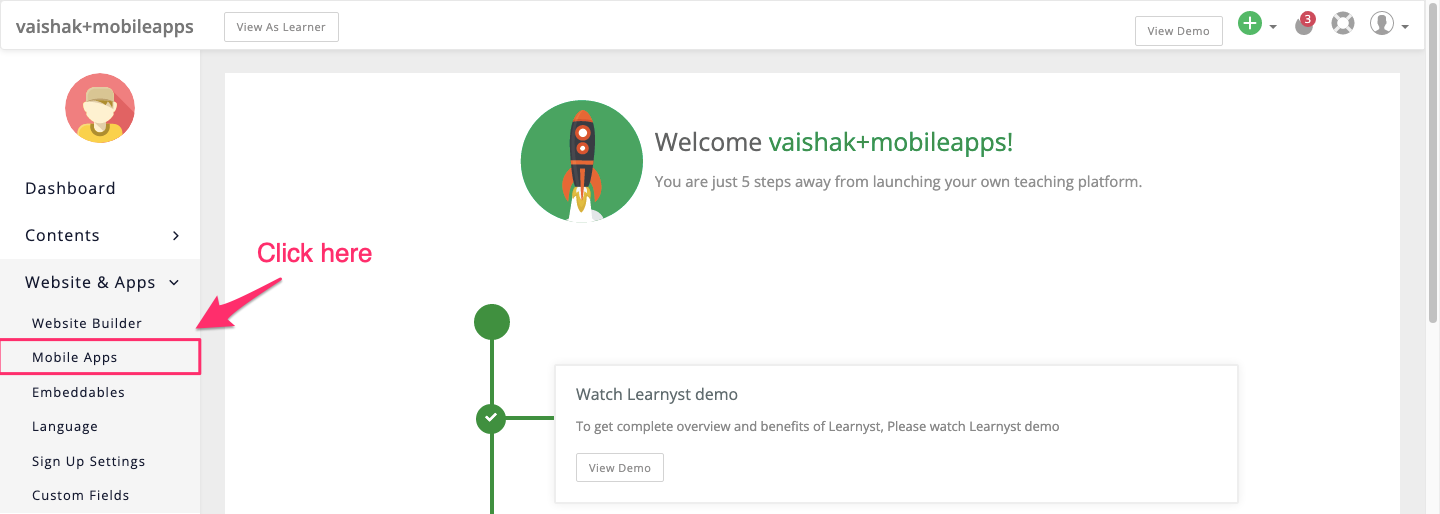
Go to Website & Apps within your admin dashboard and select the Mobile Apps
-
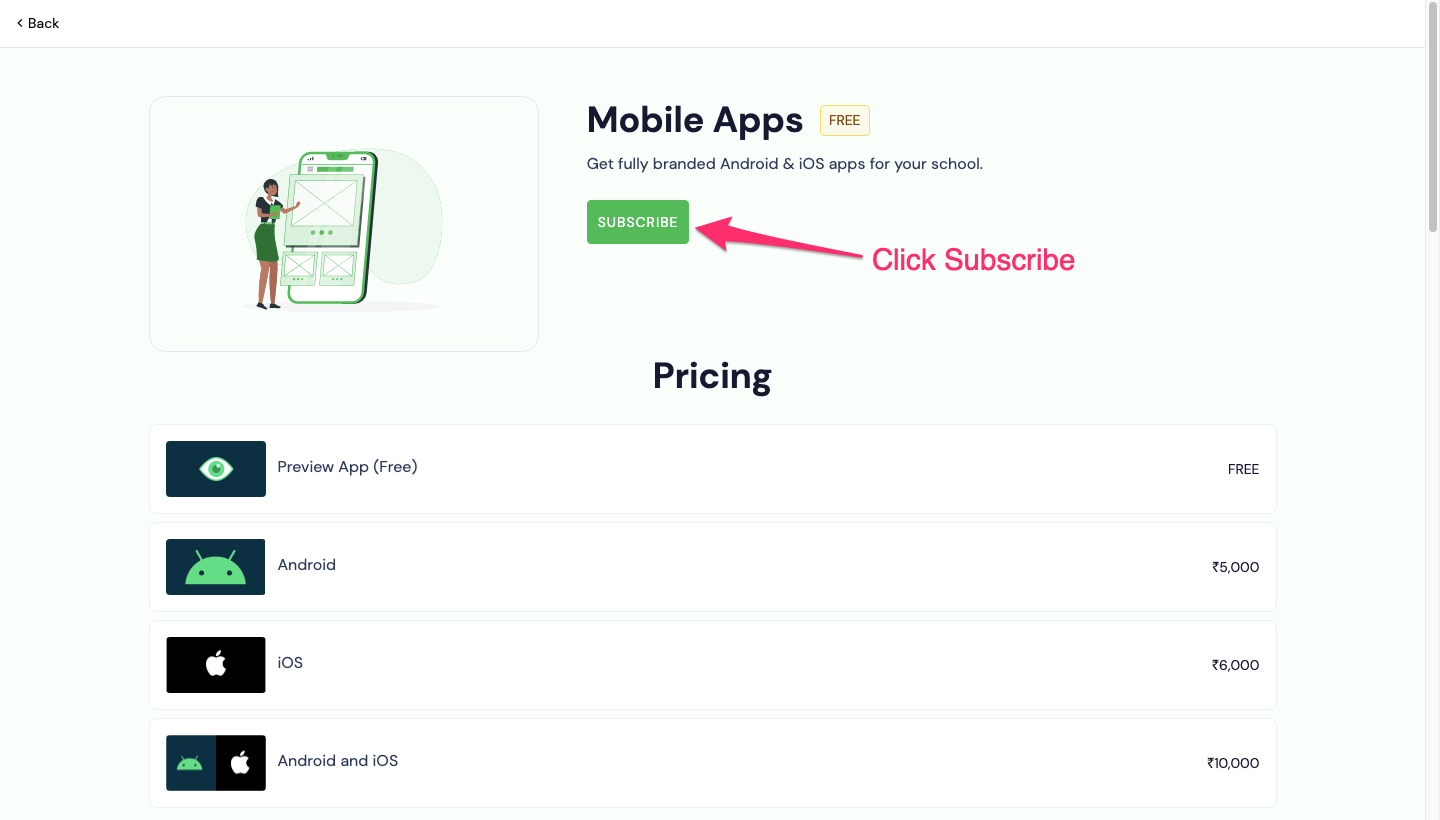
Click on Subscribe to purchase the mobile apps
-
Here, you can purchase Android apps and start building your apps.
Next, let's see how to build your Android app.
#2. Build an Android App (Without Security)
Create Your App Name and Bundle Id
-
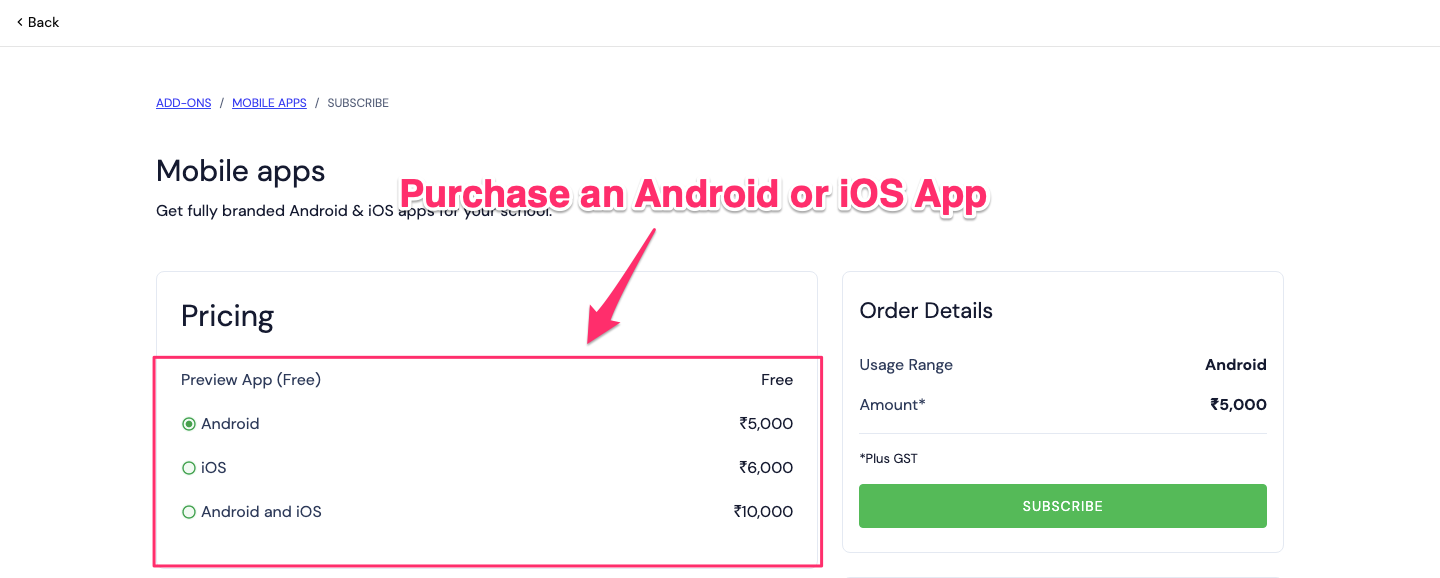
Once you click on Subscribe for Free button (above), you will see a Build Apps dashboard. Here, you can click on the Build app (Android app).

-
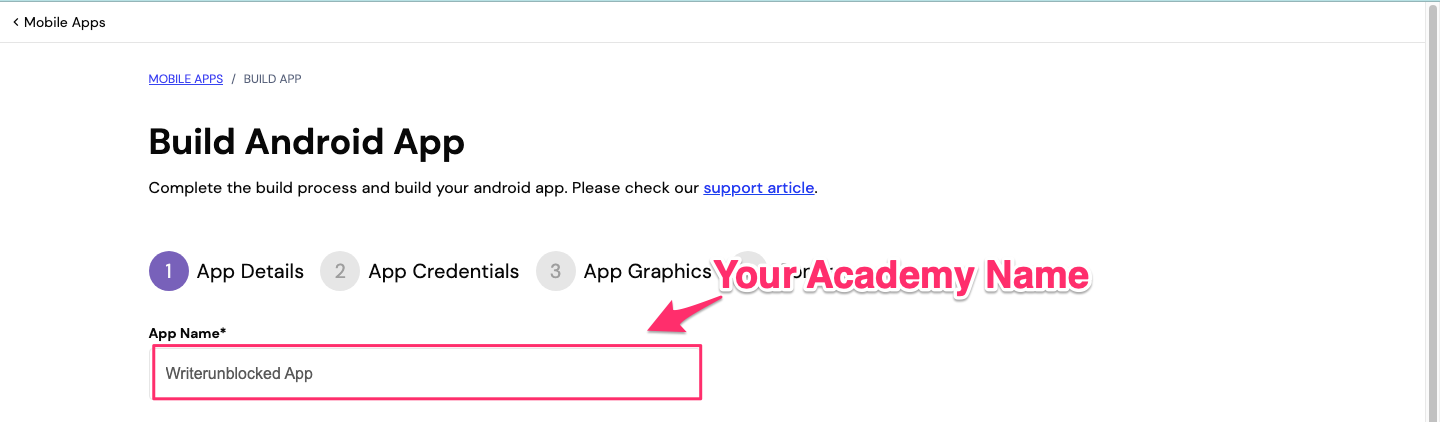
Next, you can enter your academy name within the App name field

-
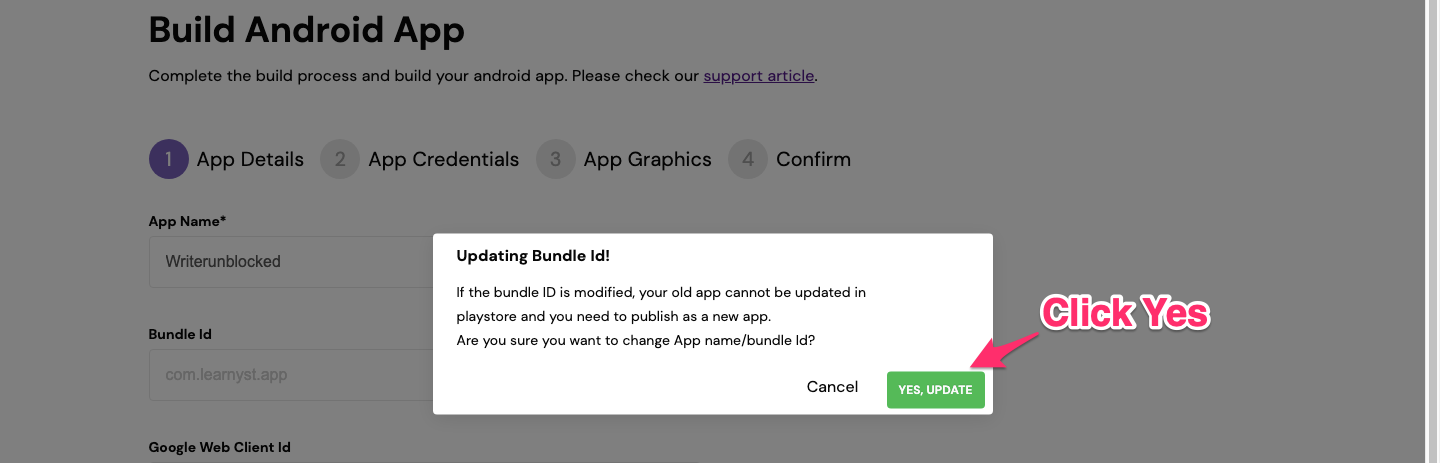
Click on the Bundle id and accept Yes.

-
Within the bundle id, enter the reverse of the custom domain to which you have mapped your Learnyst account.
-
So, if you have mapped your Learnyst account to www.learncodeonline.com then enter your bundle id as com.learncodeonline.www

-
If you have mapped your Learnyst account to www.courses.learncodeonline.com, then your bundle id should be com.learncodeonline.courses.www

-


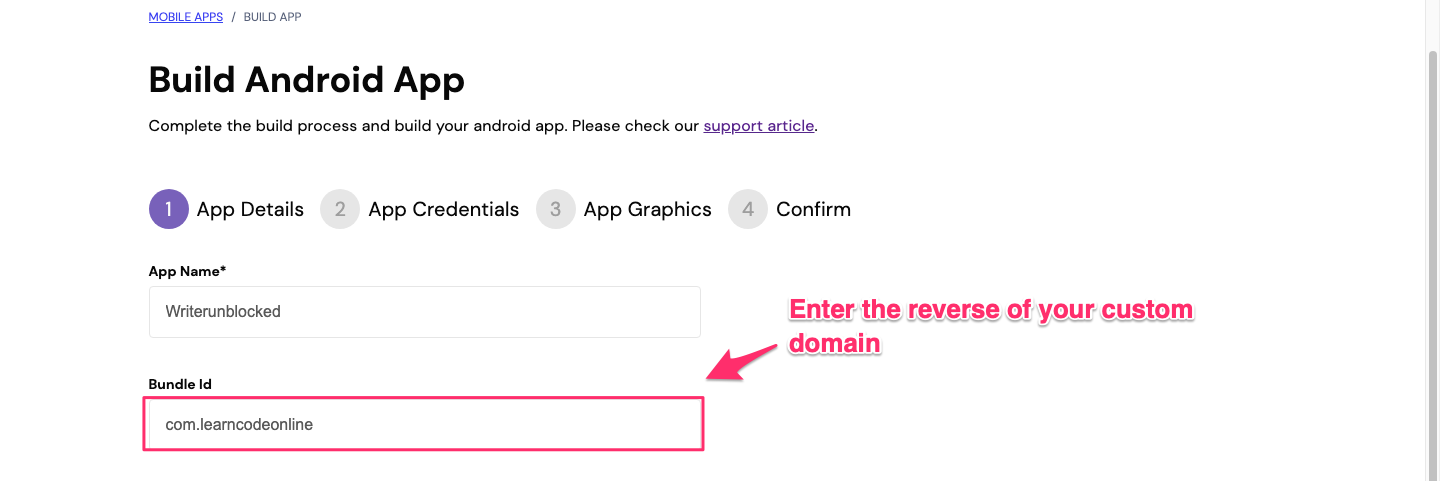
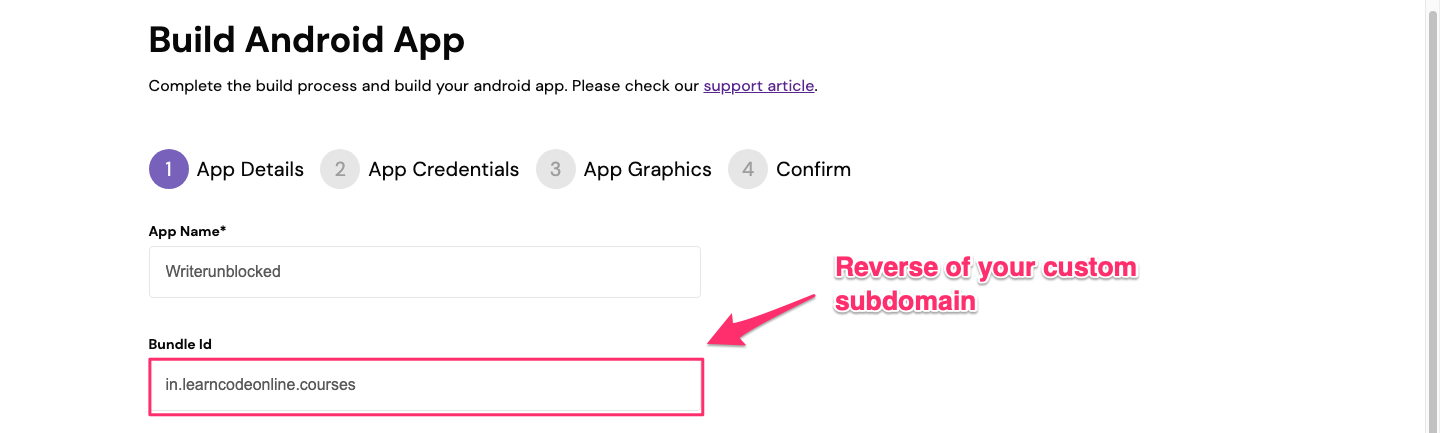
Note: Note your bundle id. As this will be later required while uploading your apps on Playstore.
-
Next, you can enter your Google Web client id and Facebook App id. This is required if you want students' to log in using Facebook or Google Sign in.

Note: You can read the articles on how to generate google webclient id and facebook app id for your school.
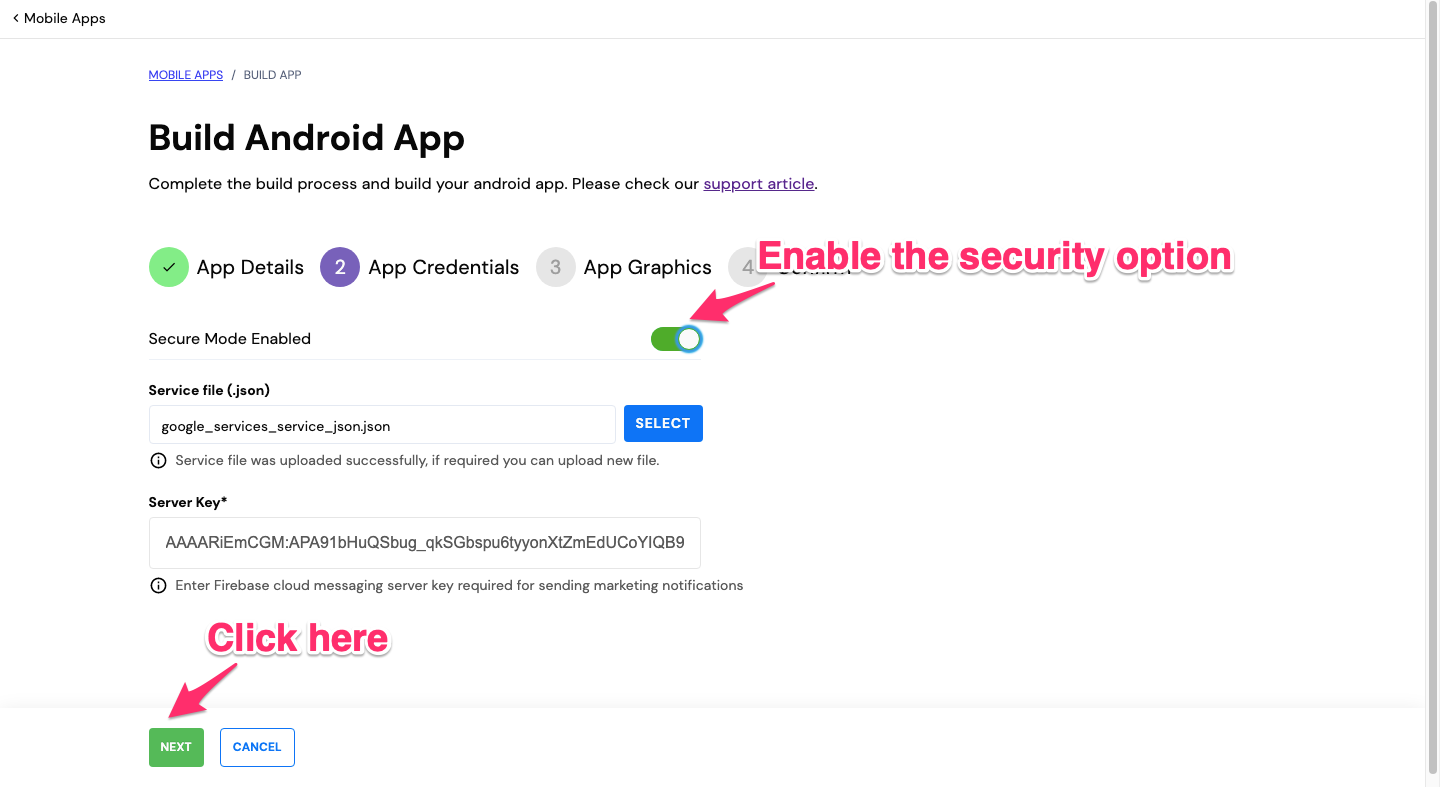
Disable Your App's Security
-
This takes you to the App credentials section. Here you need to disable the Secure mode enabled option as shown.


Note: As app screenshots are required to publish your app on the Playstore, we are disabling the security option. You can later build a secured version of your app and upload it to the Playstore.
Create JSON File and Server Key
-
Next, you need to create a JSON file and server key from your Google Firebase account and upload it here.
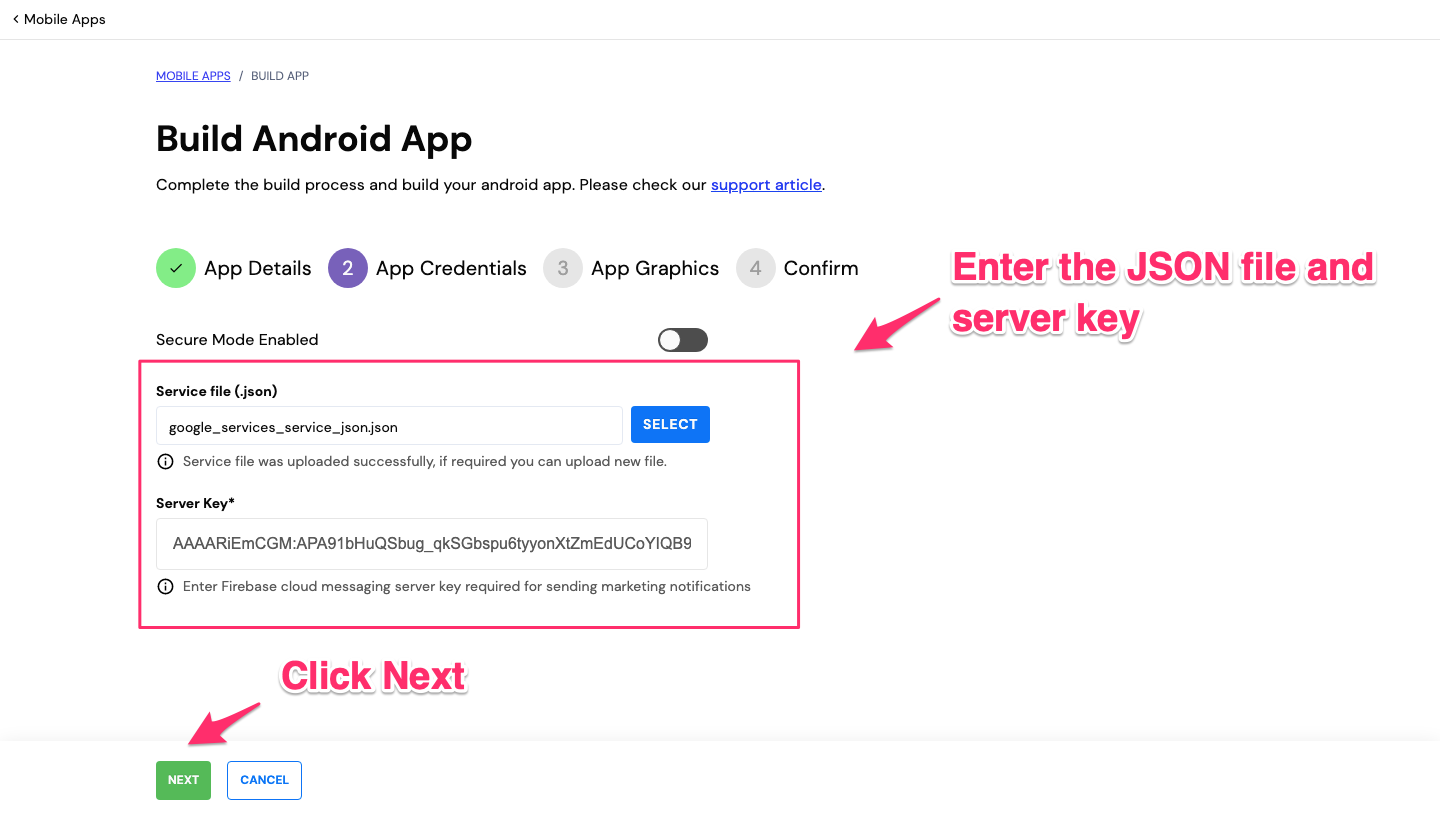
I have covered the steps in this article: how to create your free service account credentials from Google Firebase. Refer to this to create your JSON file and security key.
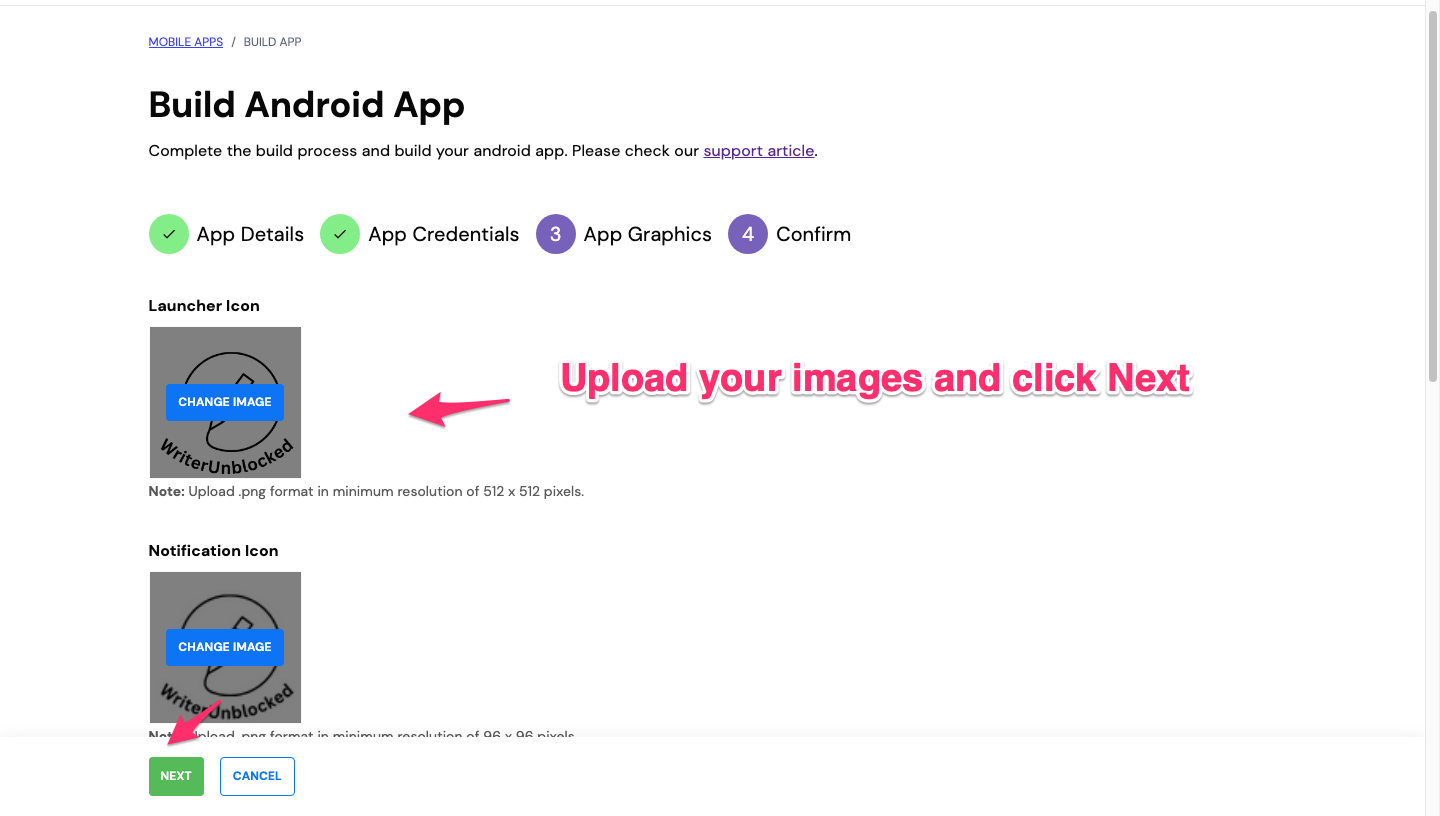
Upload App Graphics and Images
-
This takes you to the App Graphics section. Here you can upload your academy's logo and graphics icon. Refer to this checklist of eight items you need to help you build apps fast. You can use a website like Canva to create these images.
-
Click on Next, and click on Submit Build to create your own Android app build.

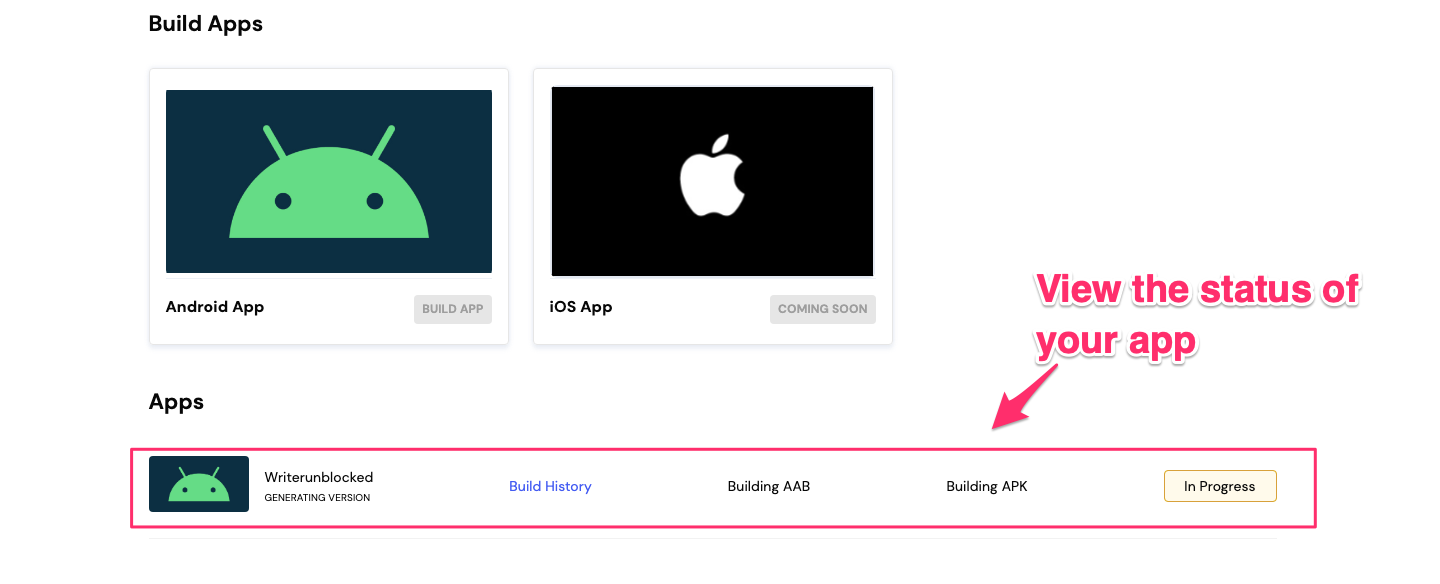
-
This takes you to the home screen where you can view the status of your app. You can check the status of your app build after 15-20 min.
Build Your App and Get the APK
-
If the App build is successful, you will see a Success message.

-
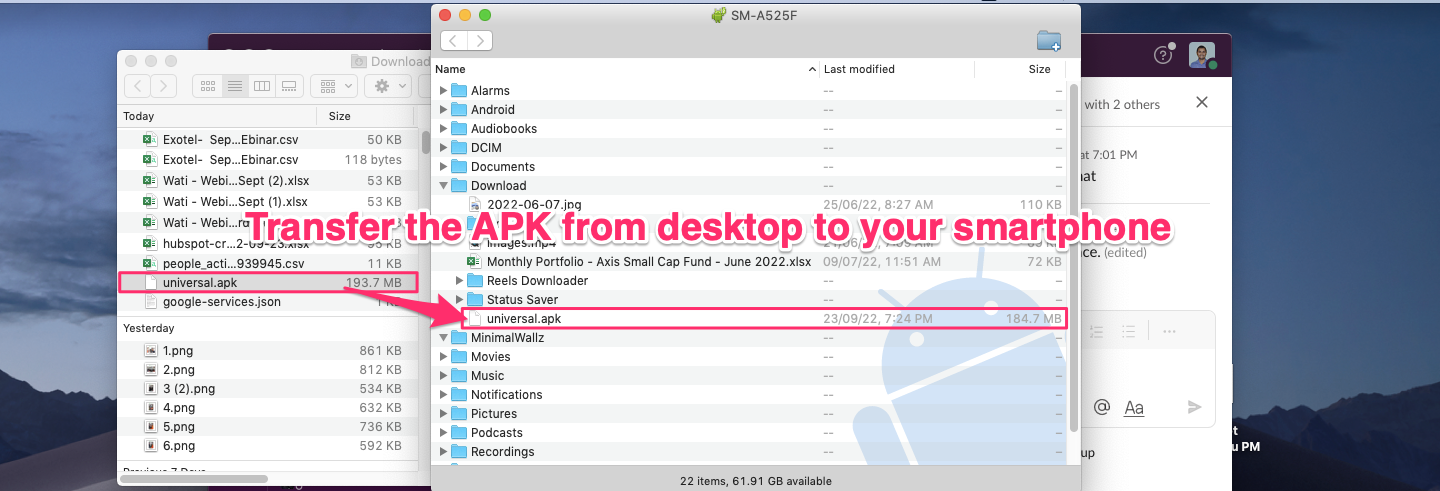
Now, click on the Download APK link first and install the app on your smartphone and take screenshots of your app.

-
Post that, you can rebuild your app with the security enabled and upload the AAB file on the Playstore.


Let me show you how to install the APK file on your mobile app.
#3. Install APK on your Mobile Apps
-
First, download the APK on your desktop and transfer it to your smartphone. You can use a data cable or upload the file on your google drive and access it from your phone.
-
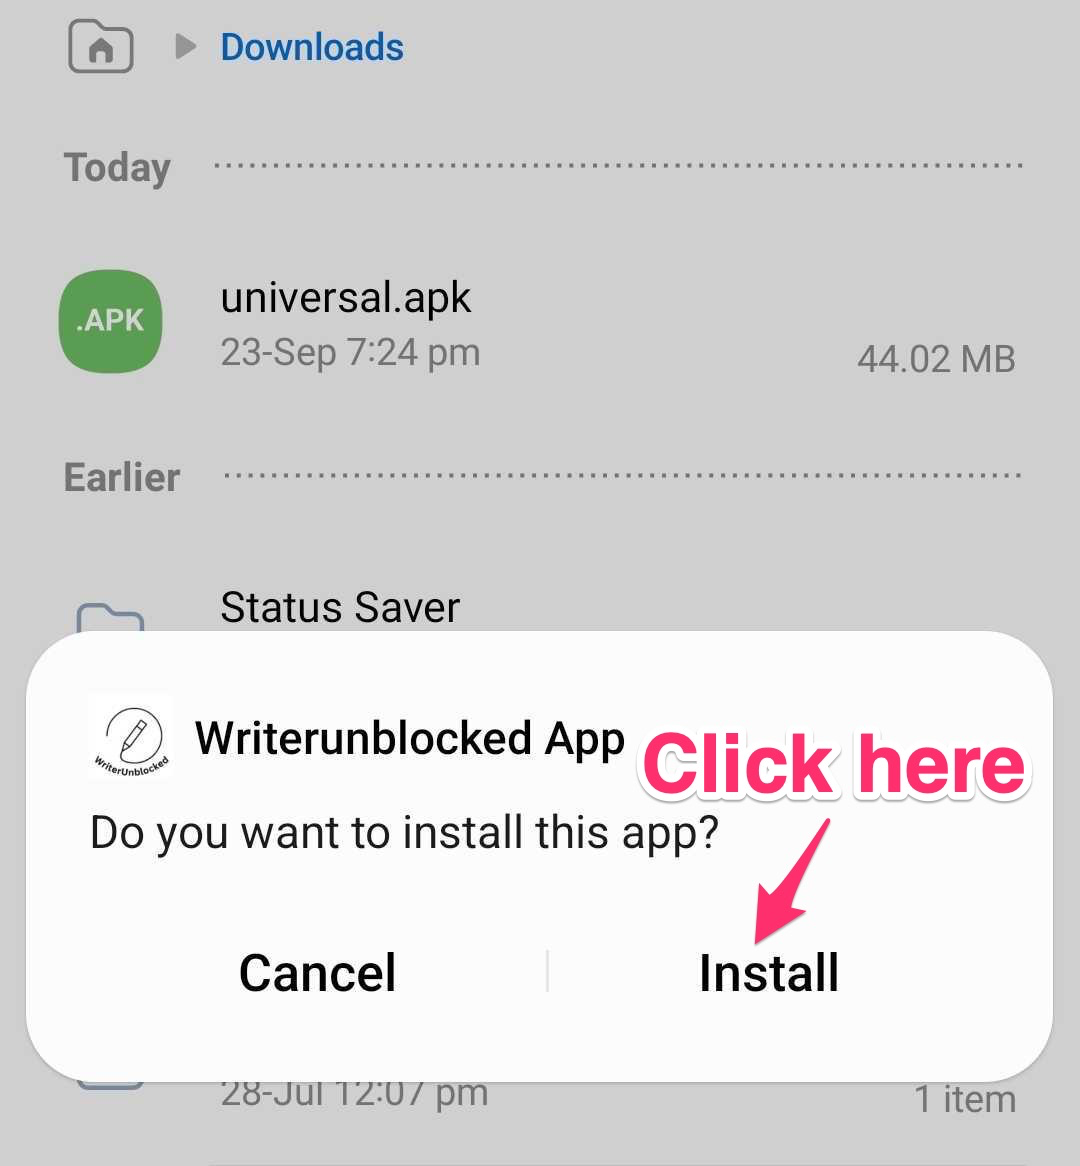
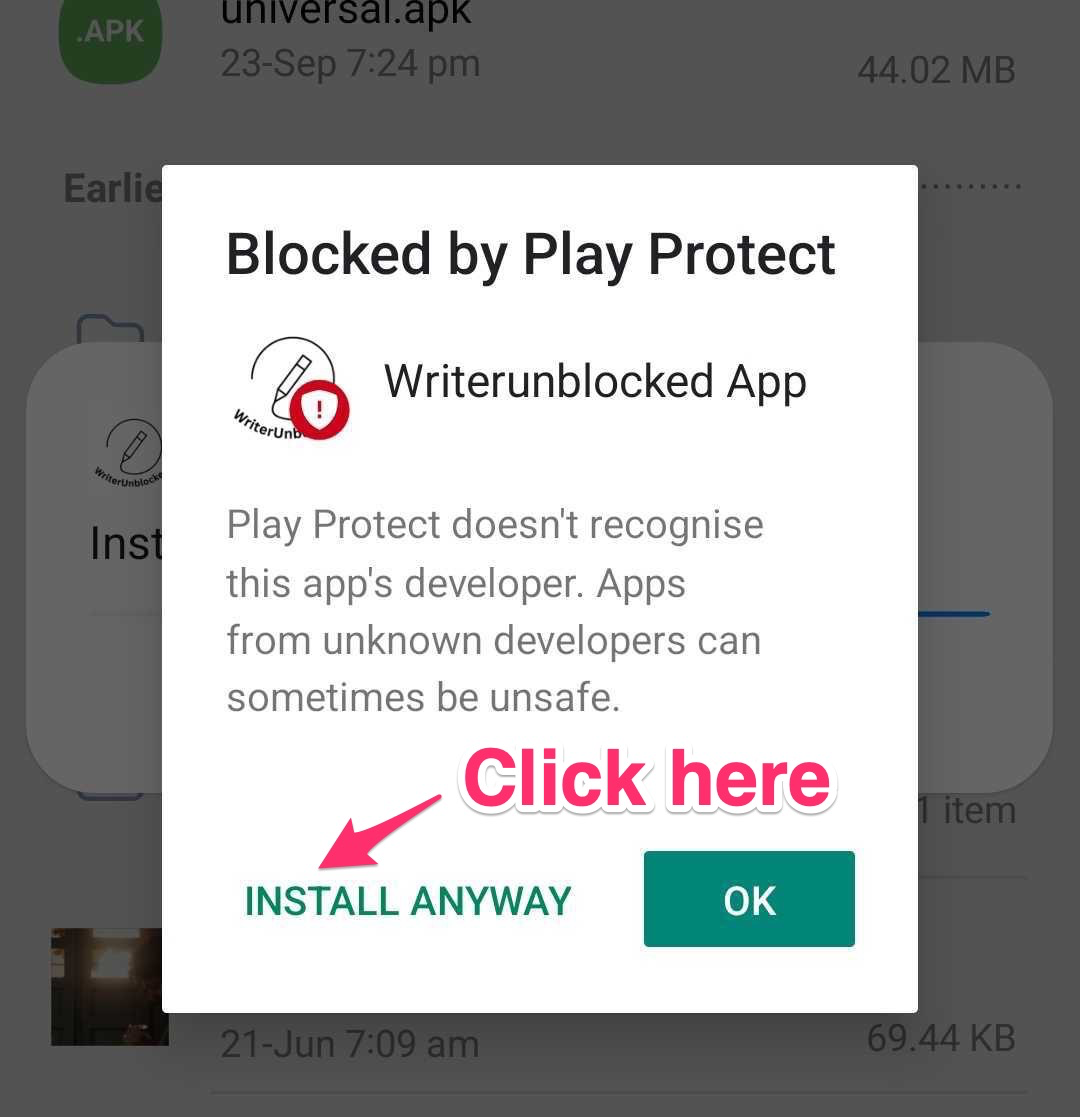
Click on the Universal.apk file on your app and click on Install.
-
Next, you can ignore the warning message and Click on the Install the APP anyway option.
-
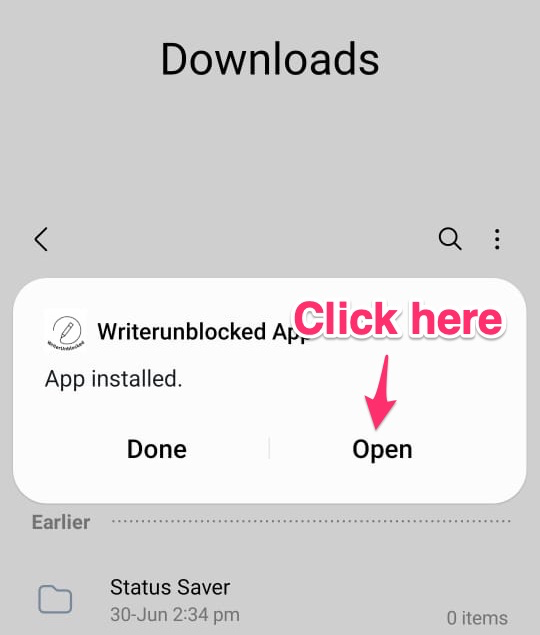
Now, you can click on Open the app and explore the app.
-
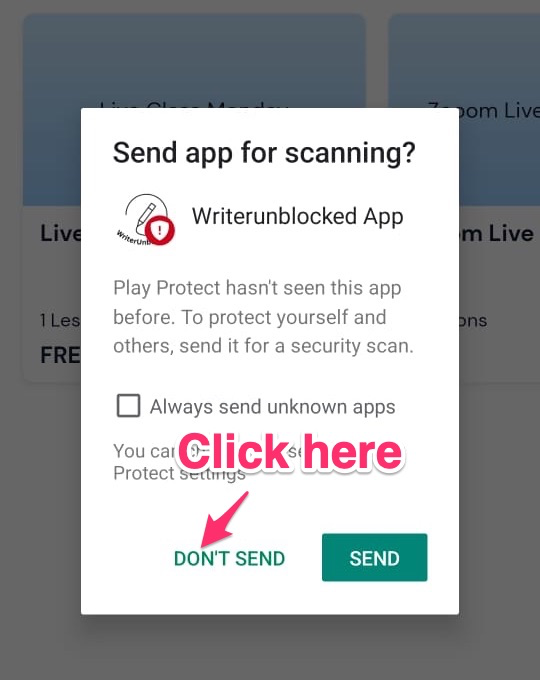
If you get another warning message, don't worry. Just click the Don't send option as of now.

-
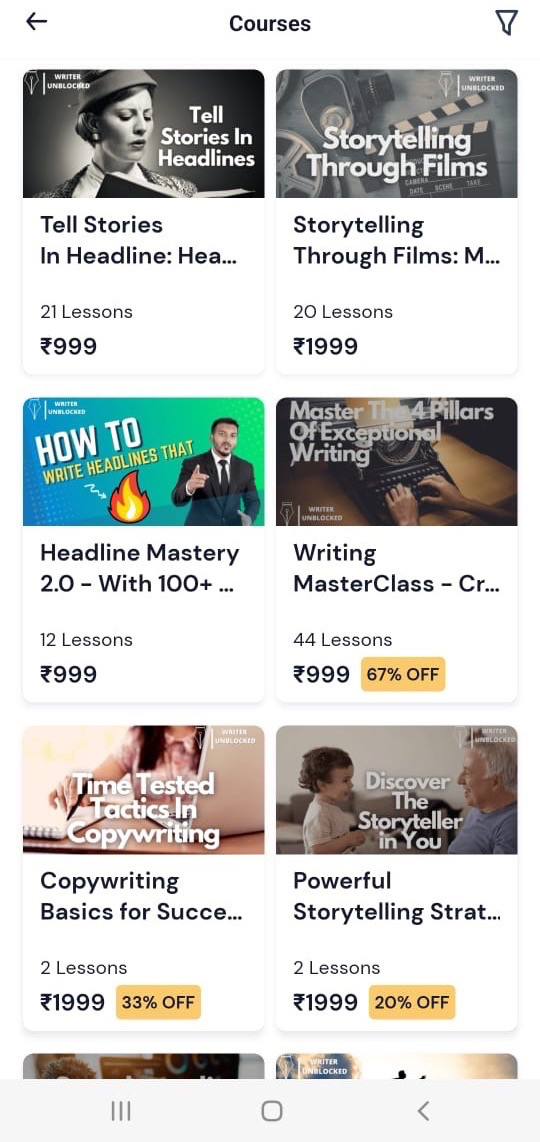
This is how your apps look. You can take a screenshot of your course store page, and course sales page.

After taking screenshots from your app, you can follow either of these options.
-
One, you can download the AAB file of this app and upload it to the Playstore. This will be an unsecured app. So, students can take screenshots or screen recordings.

-
Two, you can rebuild the app with the security-enabled option and then upload the AAB file of this secured app on the Playstore. We recommend this step.
Now, let's see how to rebuild the app and upload the AAB file of the secured app to the Play store.
4. Build an Android App (With Security Enabled)
-
You can click on Build my App within the App Builder and rebuild your app. This time you can enable the security enabled option. Follow the same steps as above
Note: You can use the same JSON file and security key—no need to generate it again.
-
After the app build is successful, you can download the AAB file and transfer it to your phone.

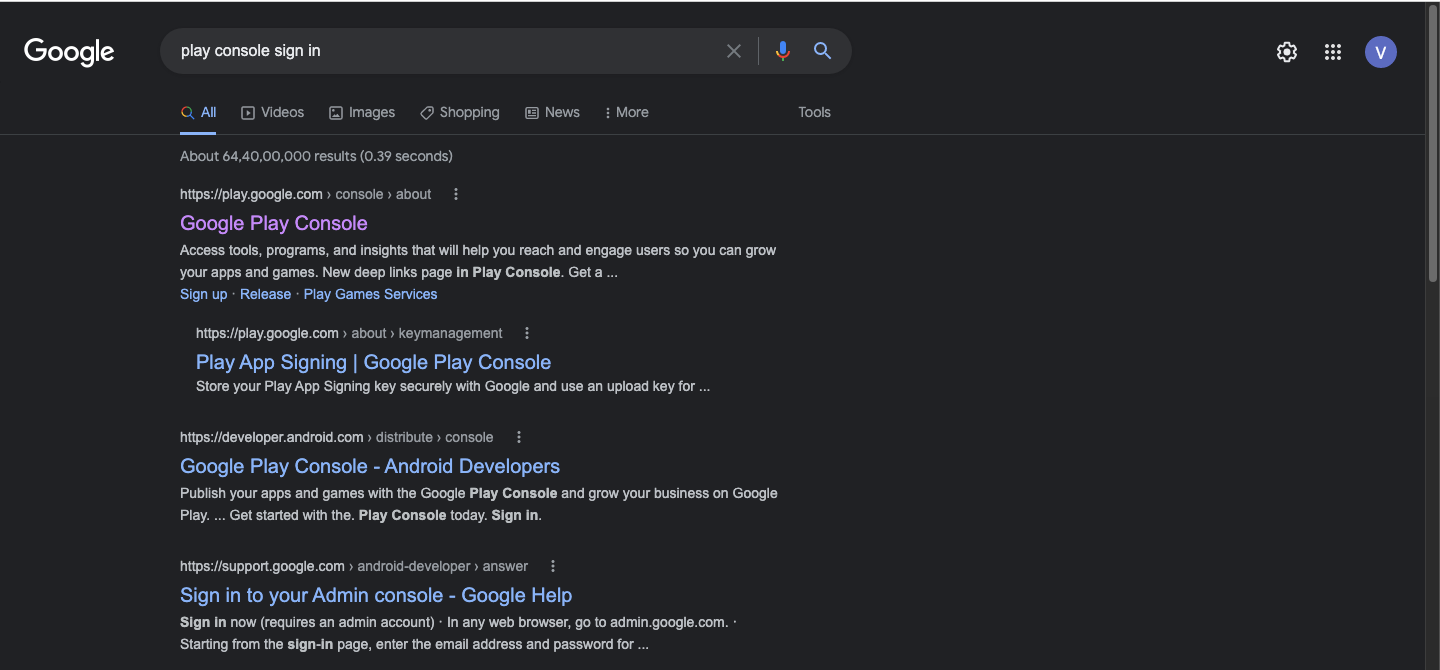
#5. Create Your PlayStore Developer Account
-
To upload your apps to the Play store, you need to create a developer account on the Google play console. On the Google search bar type in "Google Play console sign in"and log in with your email id.
-
After paying the fee to create your own developer account, you are ready to upload your apps. Refer to this article to know how to create your developer account.
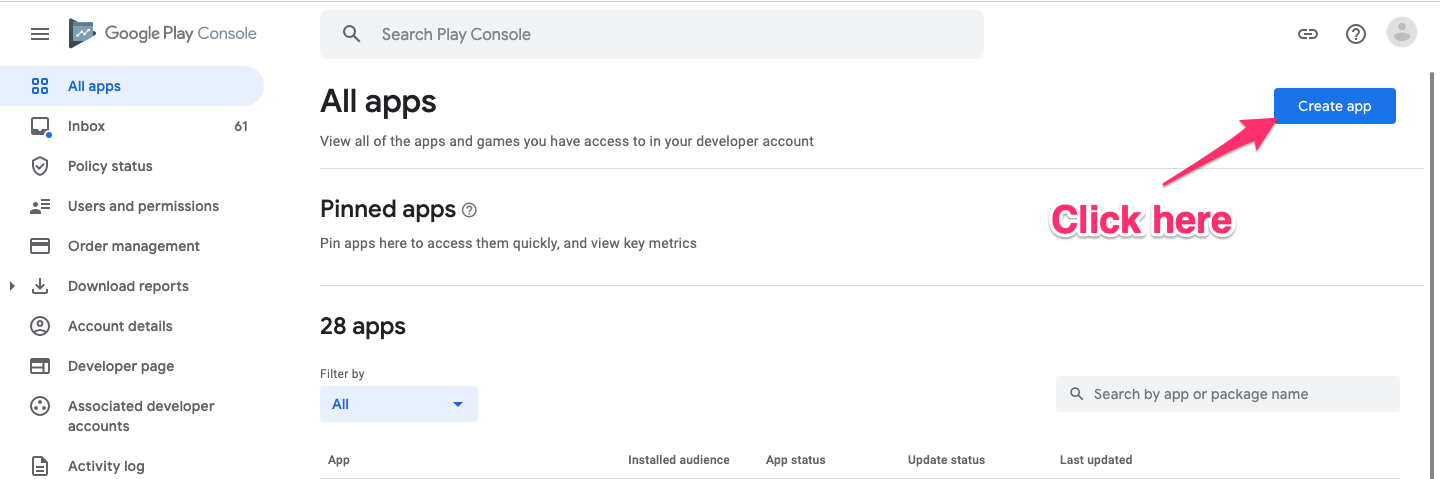
#6. Create Your App On Your Developer Account
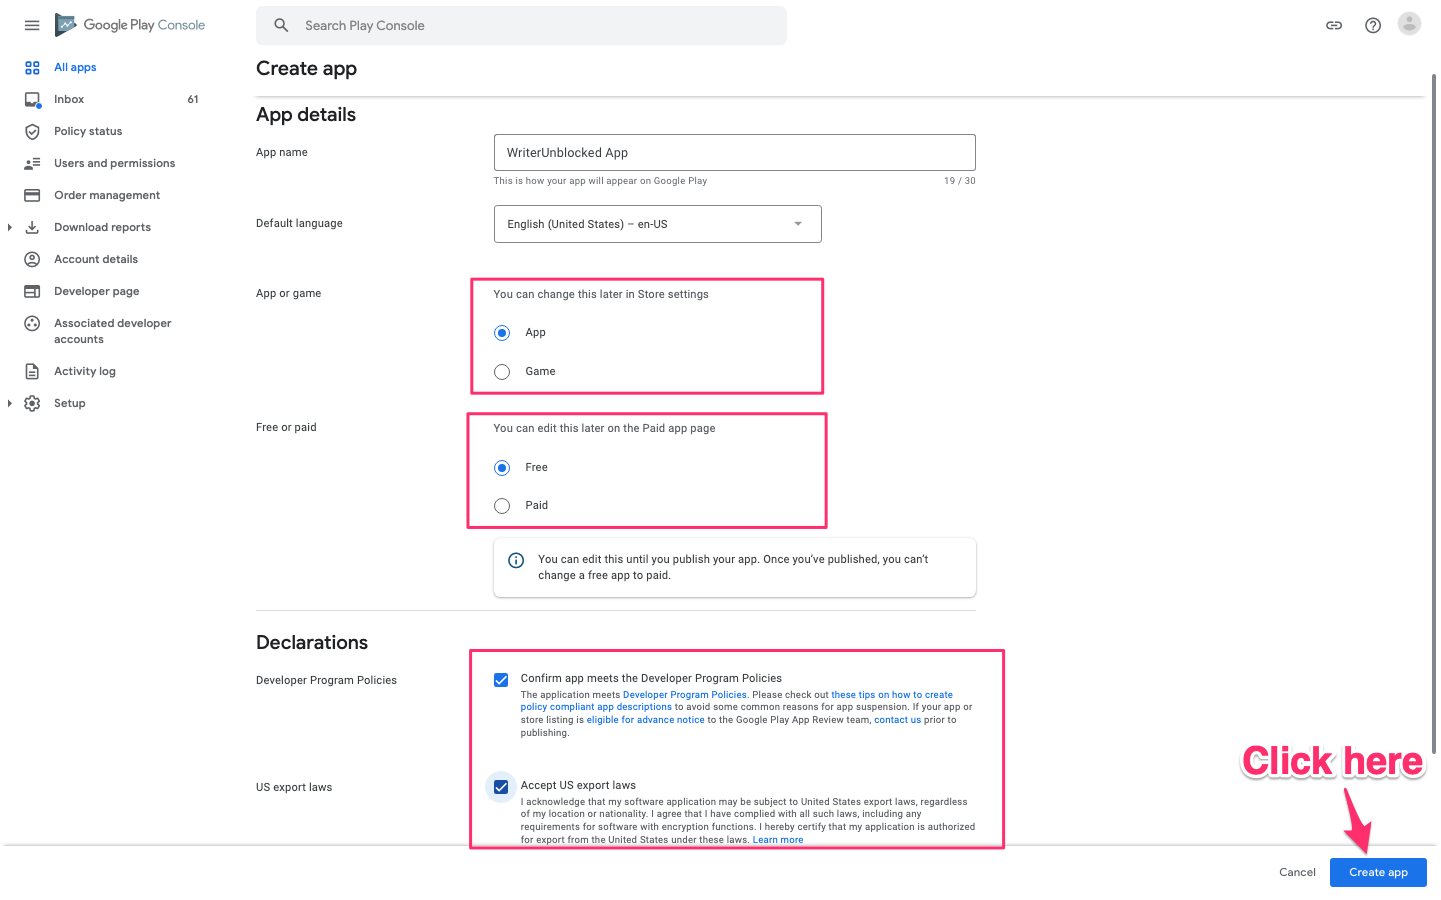
Create Your App
-
Next, go to the All apps section within your play console and click on the Create App button.
-
Here you can enter your app details like your app name, type, and price, accept the declarations and then click on Create App.
-
This takes you to the App dashboard. Scroll down to the Setup your app section and fill out each of these options.
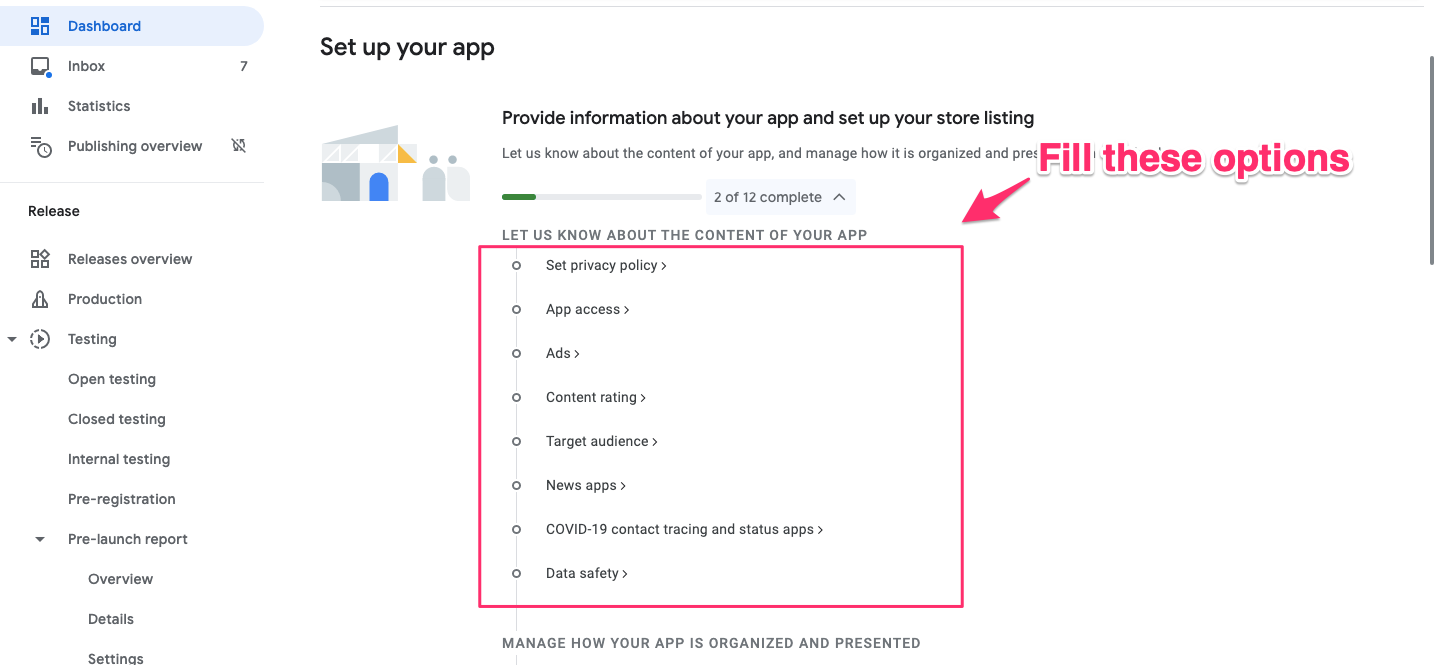
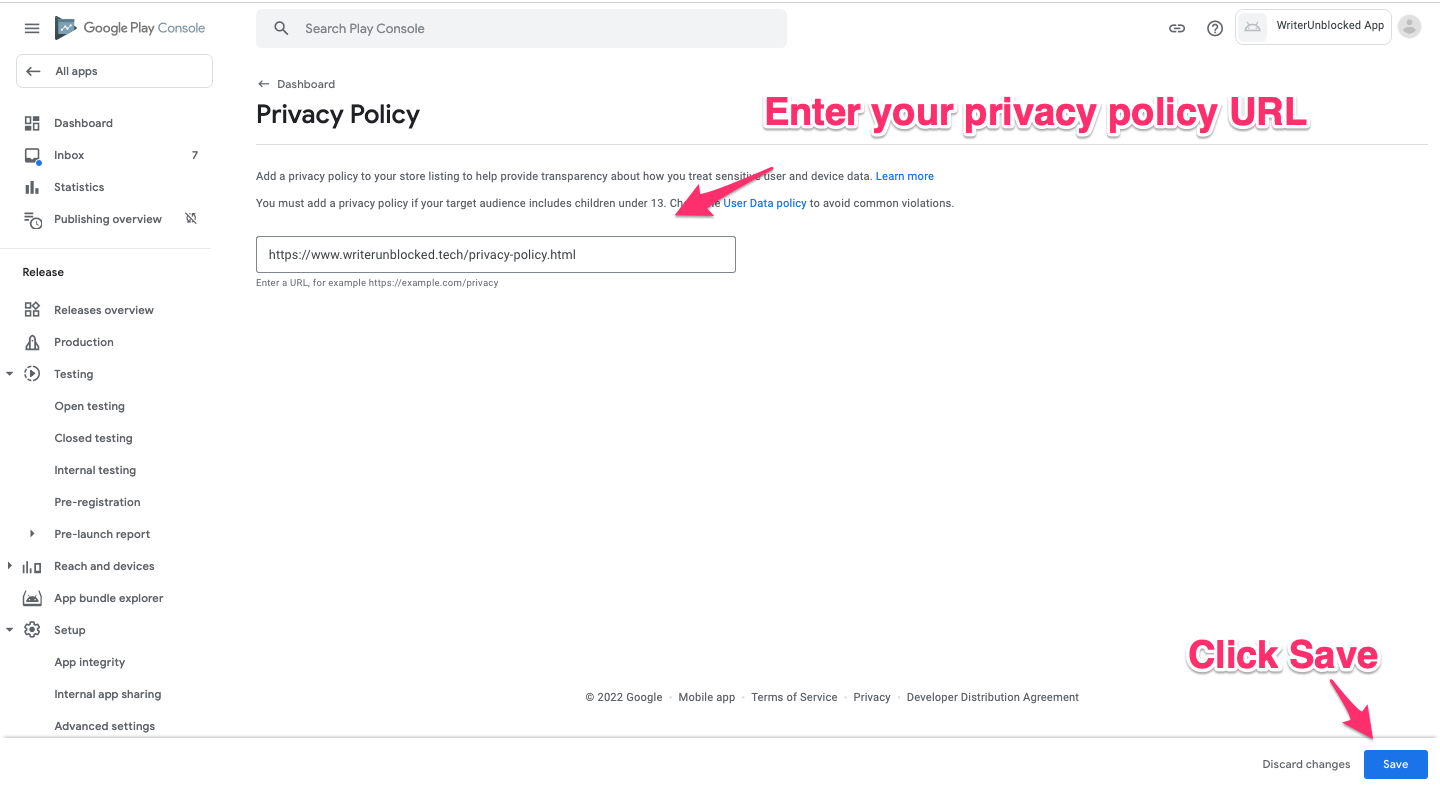
Add Your Privacy Policy Link
-
For example, click on the Set privacy policy section and enter your website's privacy policy URL. Check this article, to know how to create your own privacy policy URL.

-
Other sections like App access, Ads, Content Rating, Target Audience, News Apps, Covid-19 contact tracing, and status apps are pretty straightforward. To know more refer to this article to fill out all the
-
within the Setup your App section.
-

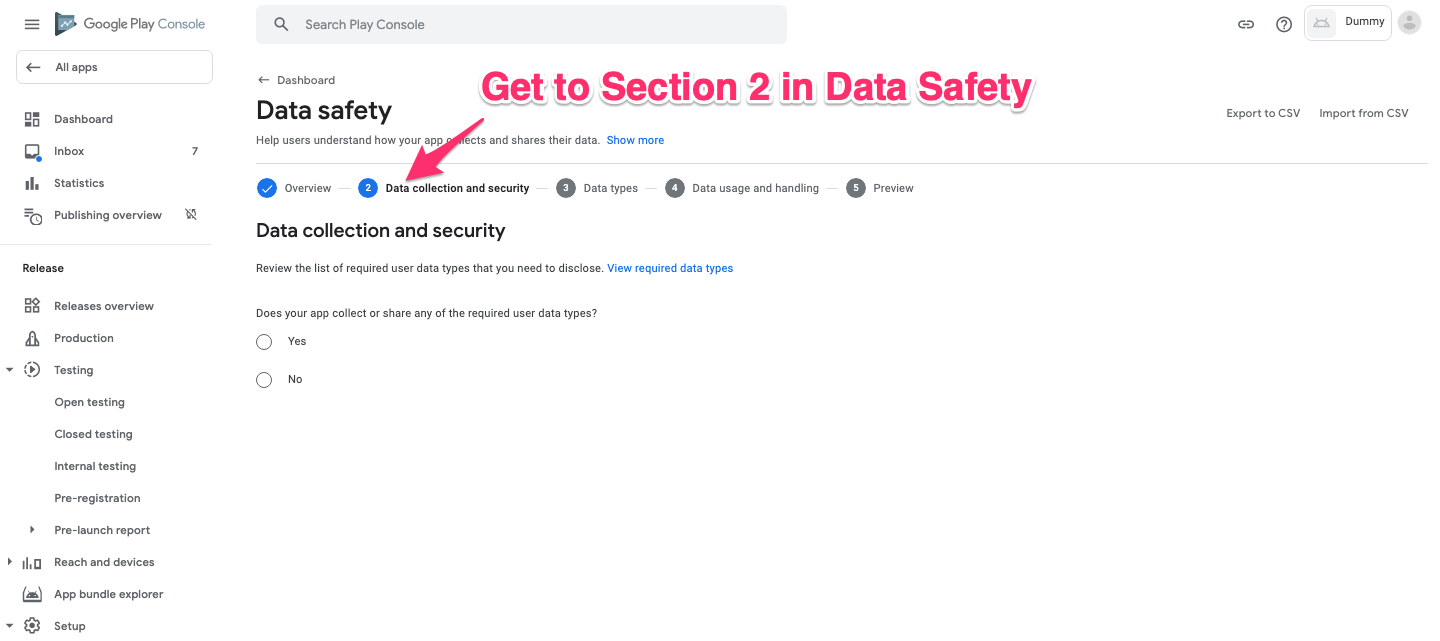
Add Data Safety Details
-
The Data Safety section is very detailed. So, to help you fill in the Data safety questions, click on the Data safety section, click Next and get to the Data collection and security section.
-
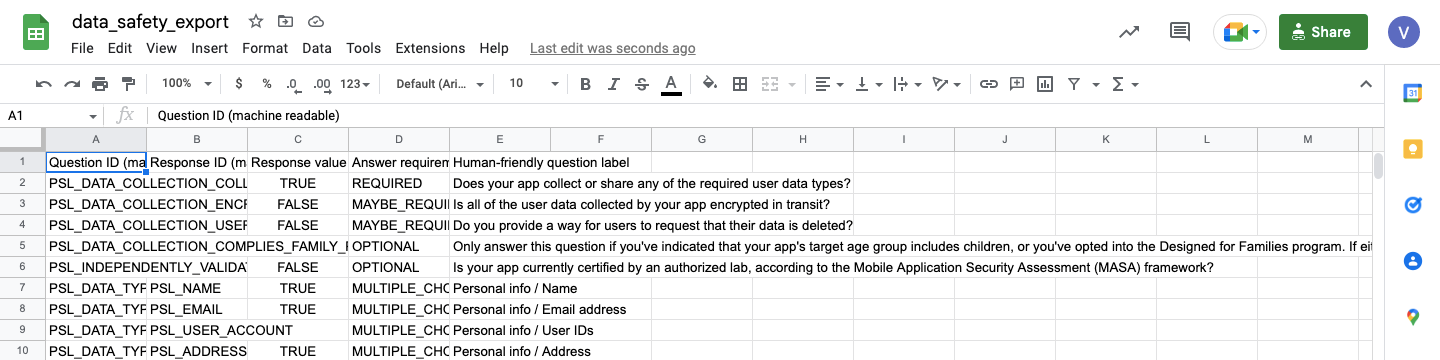
We have created a CSV file that contains prefilled data safety details. This is a generalized template. You can download the template from this link: Data Safety Export File

-
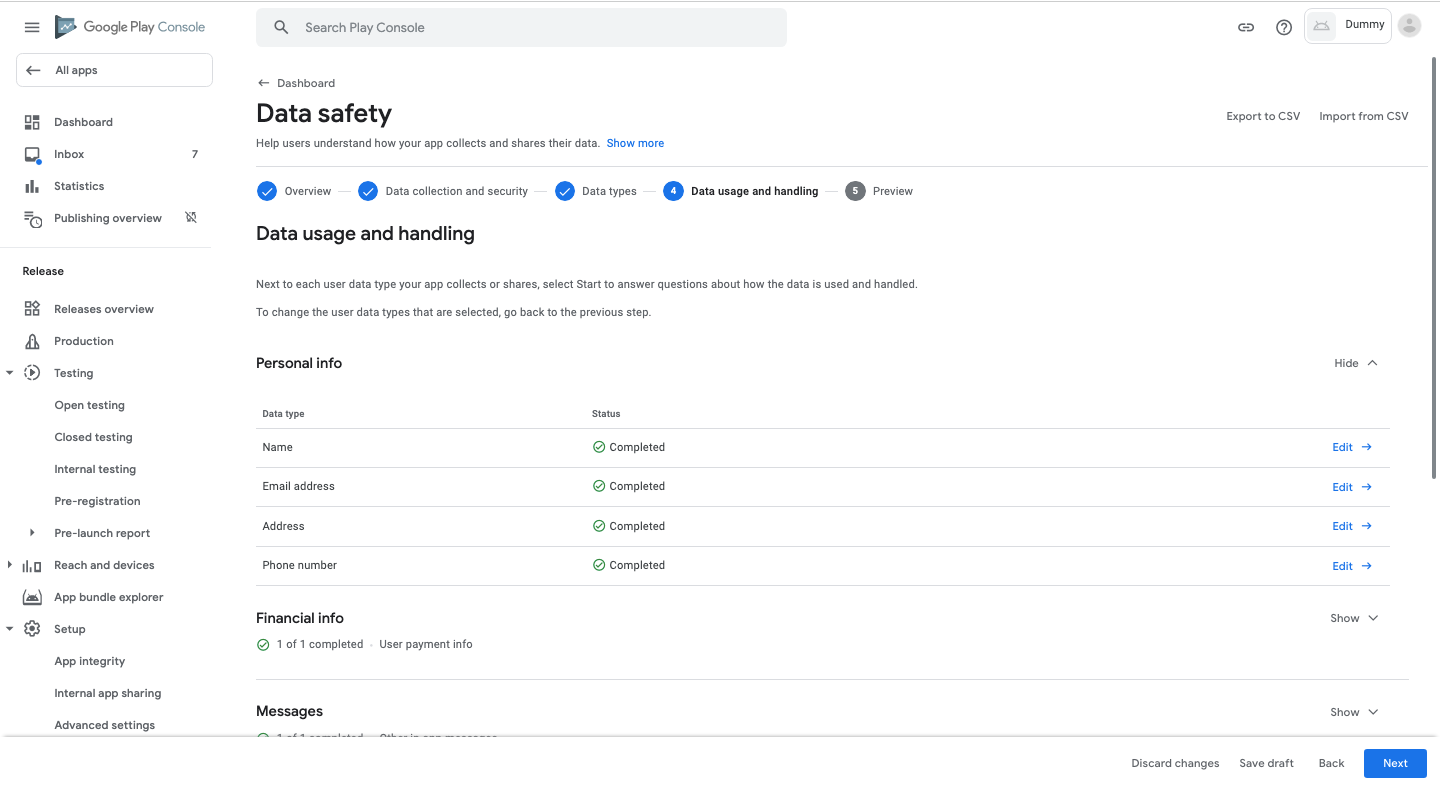
Now, click on Import from CSV option and upload the CSV file. This prefills the major sections within Data safety.


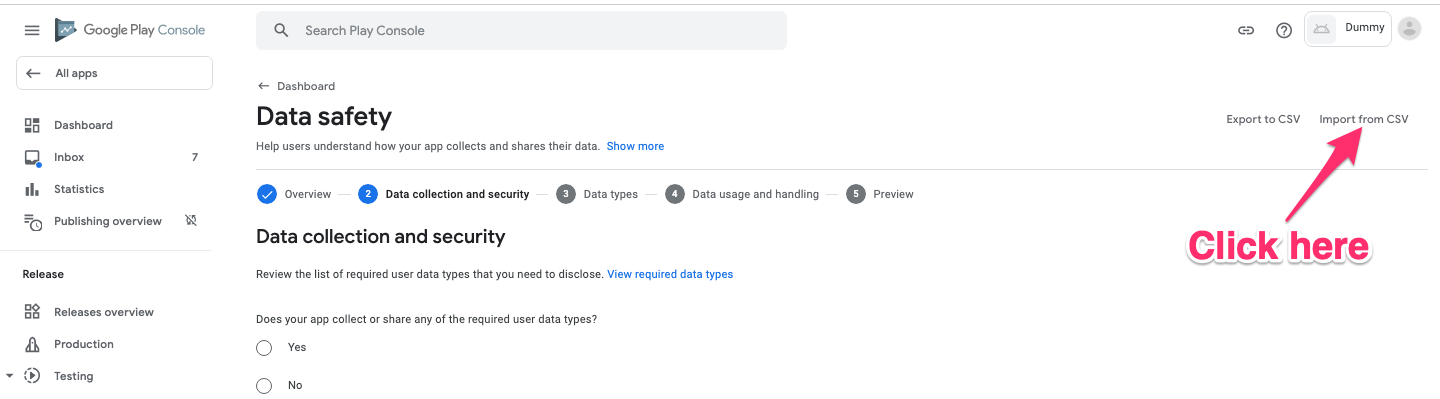
-
Note that, we have only covered general cases. Please review this section and select the options that are relevant to your business.
-
You can download the template from this link: Data Safety Export file
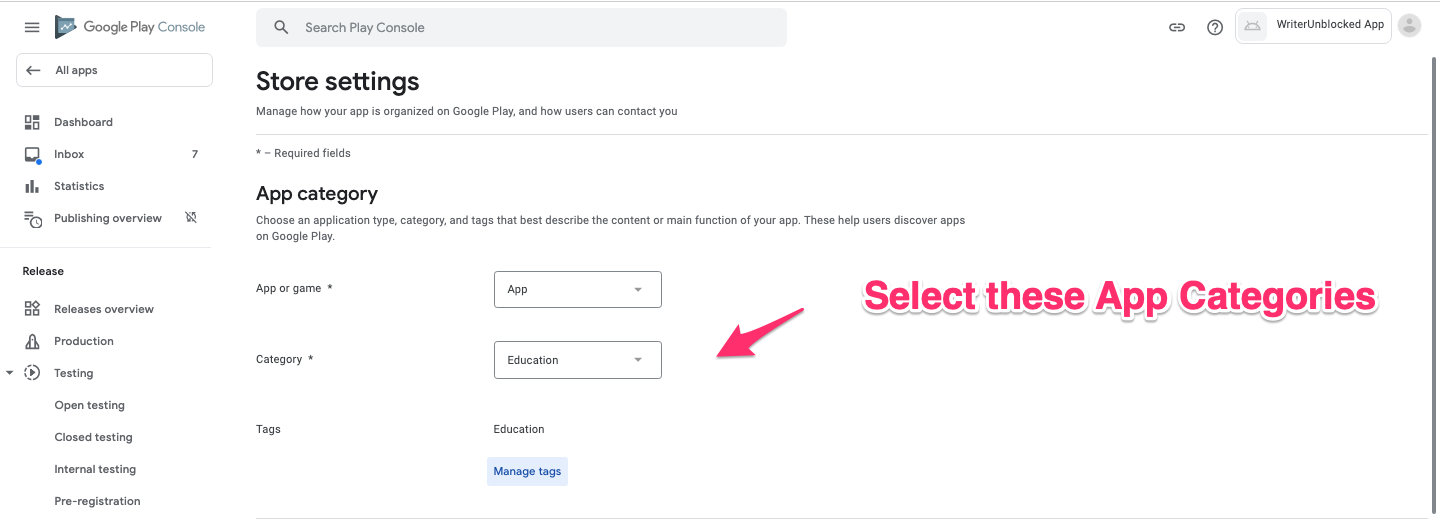
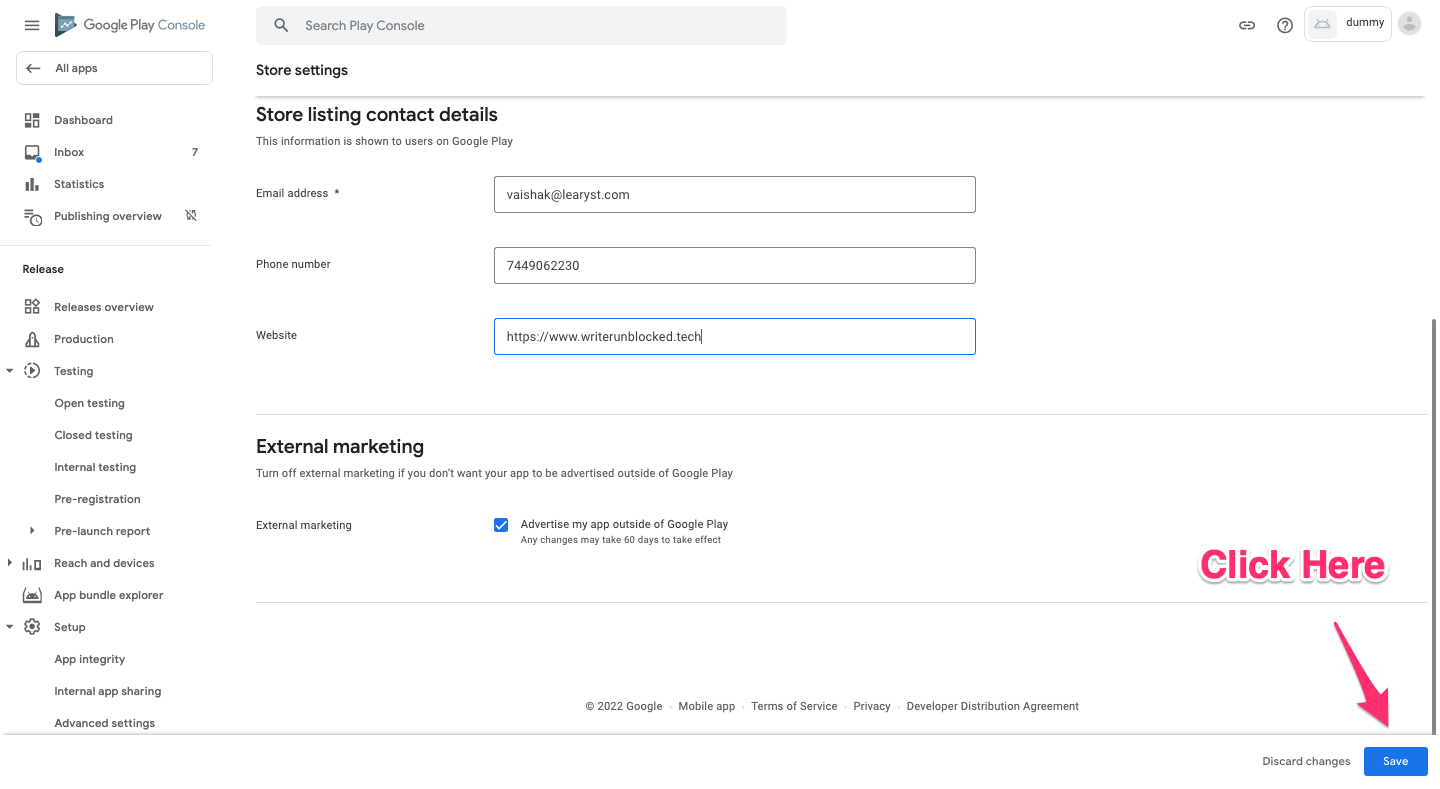
Enter Your App Category & Contact Details
-
Next, go to the Manage how your app is organized section and define your app categories. So, you can select App, select a category, and tag it as Education.
-
Next, fill in your contact details, phone number, and website address and click on Save.
-
Next, set up your store listing by entering your App name, and short and long descriptions.
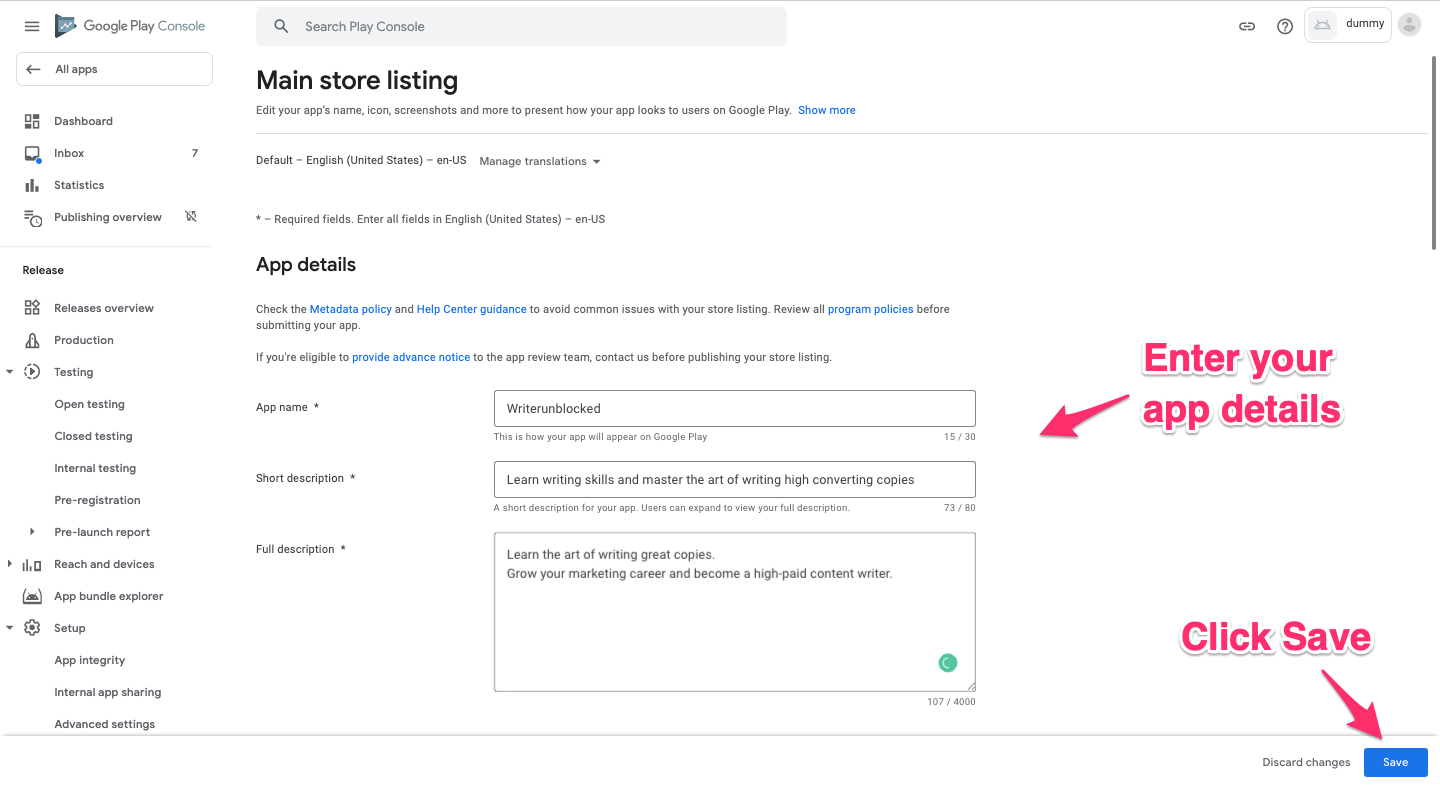
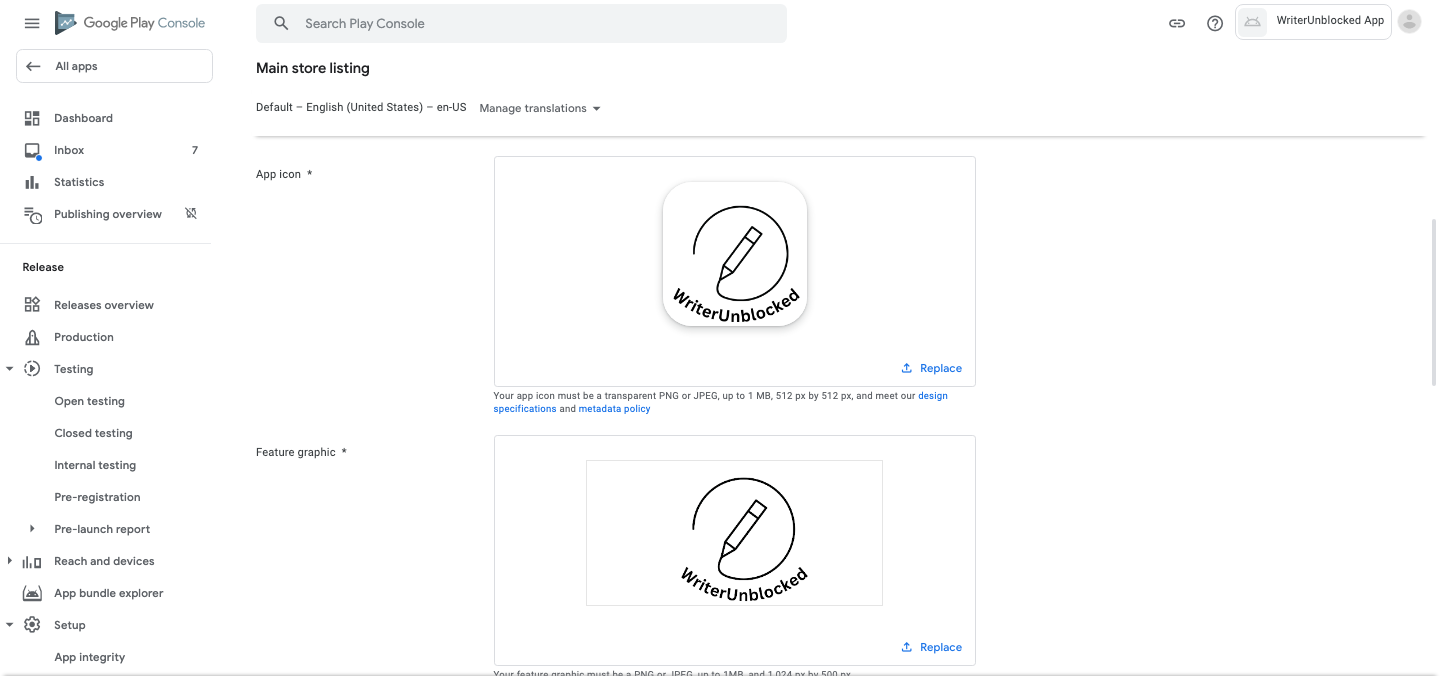
Upload Your App Creatives
-
Now, upload your academies app icon (512x512px), featured graphic (1024x500px)
-
Next, upload the screenshots of your mobile app and click on the Save button. This completes the Setup of your app on the Playstore process.

#7. Publish Your Android App
-
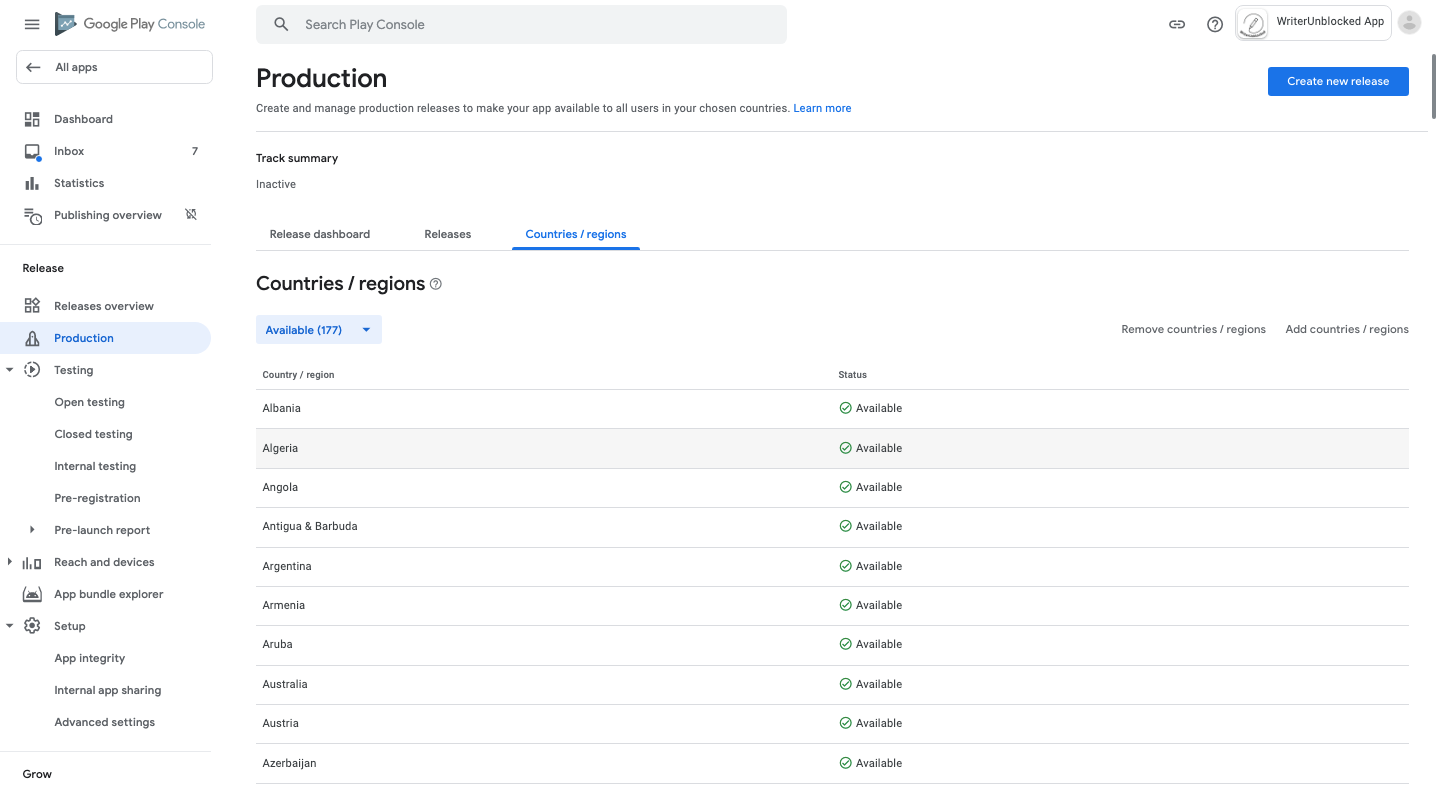
Next, to publish the app, go back to the Google Play console, go to the Publish your app on Google play option, and select countries and regions.
-
Click Add countries or regions and add all the countries.

-
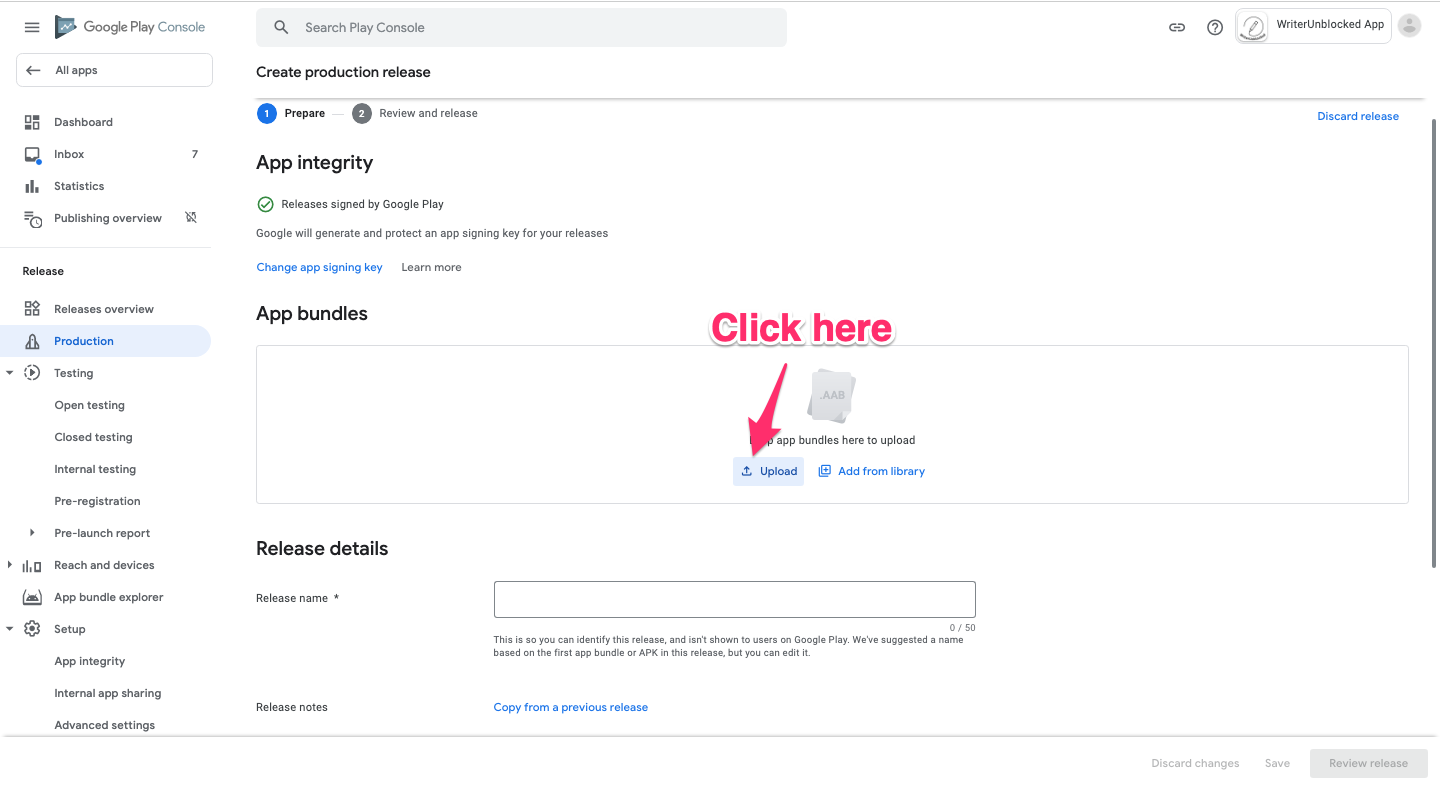
Next, click on Create a new release button


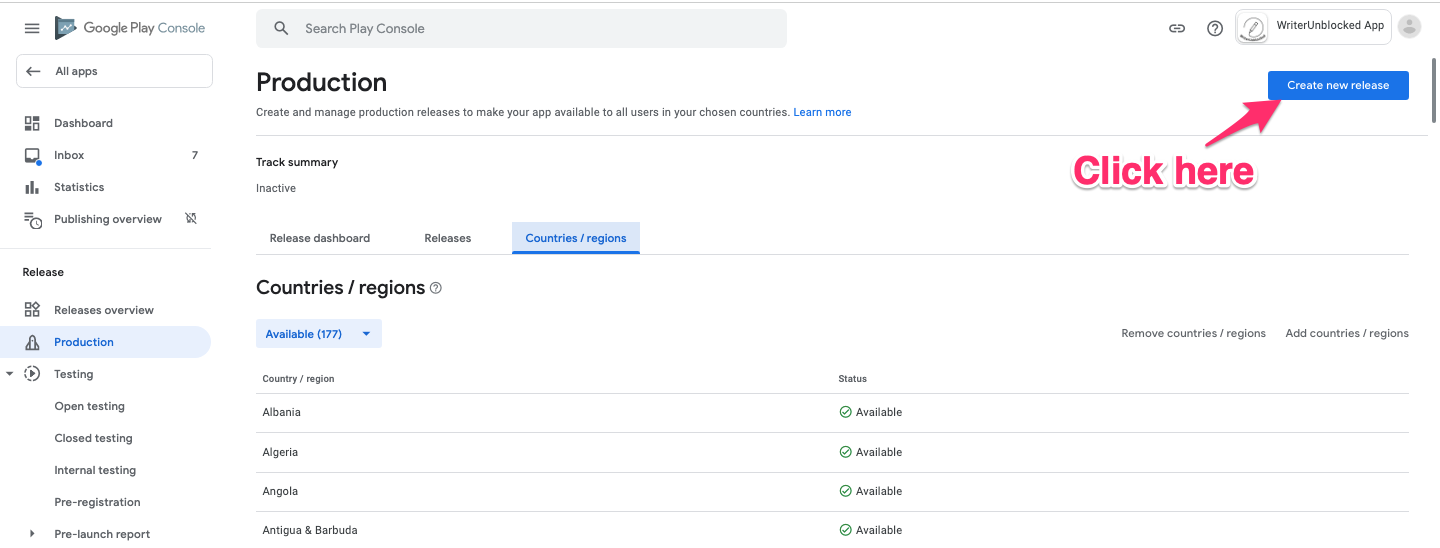
-
Click on the Upload button to upload your AAB file
-
The uploading takes 15-20 minutes to complete. After that, you can enter your App release name (example: your app name - v1. ) and click the Review release button.
-
Now, click on the Start rollout to production button to complete the process.
-
Agree to roll out the app to all the selected countries.

-
After this, the Google team will review your app within a week. Post the review, your apps should be live on the Playstore.