- To create a new webinar, please log in as an admin.
- You'll arrive at the admin dashboard. Then, from the menu bar on the left, pick Contents.
- Now, you'll see the term webinar beneath it. Click it.
.png?width=688&height=341&name=cre%20web%20(1).png)
- It will navigate you to this page. Now, click the Create button to begin a new webinar.

- Now enter the title and price of the webinar
.png?width=688&height=341&name=cre%20web%20(3).png)
- If you are willing to provide this webinar for free, simply select "Make this a free webinar."
.png?width=688&height=341&name=cre%20web%20(4).png)
- Then select the Content Security option.
.png?width=688&height=341&name=cre%20web%20(6).png)
- Encryption: You can secure your content from piracy and theft by selecting an encryption option. We are utilising cutting-edge DRM technology to protect your data from hackers.
- No encryption: If you select the No encryption option, your content will not be encrypted. Unsecure content is easily downloaded and breached.
- Once you've selected the perfect security solution, click the Create button.
.png?width=688&height=341&name=cre%20web%20(7).png)
- Now you will land on this page. now click the Add Section button.
-1.png?width=688&height=341&name=cre%20web%20(5)-1.png)
- Now enter the title of the section and click the Save button.
-2.png?width=688&height=341&name=cre%20web%20(2)-2.png)
- Now, click the "Add Webinar" button.

- Now, enter the live lesson title. Then click the "Continue" button.
.png?width=688&height=341&name=add%20web%20(1).png)
- You are currently on a new page. Now, click the Configure button.
.png?width=688&height=341&name=add%20web%20(2).png)
- To select between a Learnyst meeting, webinar, or embedded live class, click here.
.png?width=688&height=331&name=live%20meet%20(2).png)
- Learnyst Meeting: with this option, all your learners can interact with each other and the host. They are designed for two-way discussions and collaboration.
- Learnyst Webinar: this is like virtual lecture halls. there is no interaction with each of your learners.
- Embed Live Class: You can use any other live platform and integrate the URL into the Learnyst platform.
- Now I have selected the Learnyst Meeting.
- Once you've chosen the live class type, provide the necessary settings for your live class.
.png?width=688&height=331&name=live%20meet%20(3).png)
- Enter how many individuals can attend the meeting.
- Enter the live class start date and time.
- Enter the duration of the live class.
- Once you've entered the necessary parameters, click the Save button.
.png?width=688&height=331&name=live%20meet%20(4).png)
- You are able to view the countdown for the live class.
- You can copy the URL of your live class.
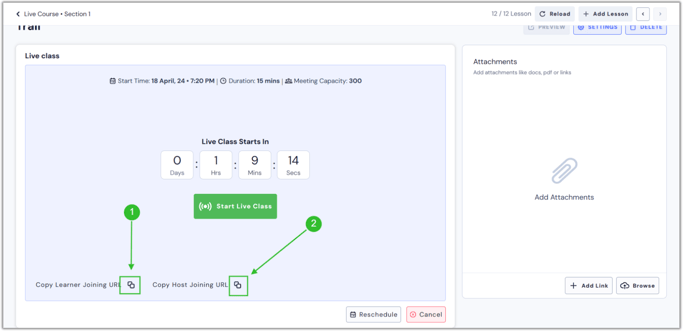
- Learner joining URL: Click here to copy and share the URL with your learners. Your learners can use this link to attend your live meeting.
- Host joining URL: Click here to copy and share the host's joining URL code.
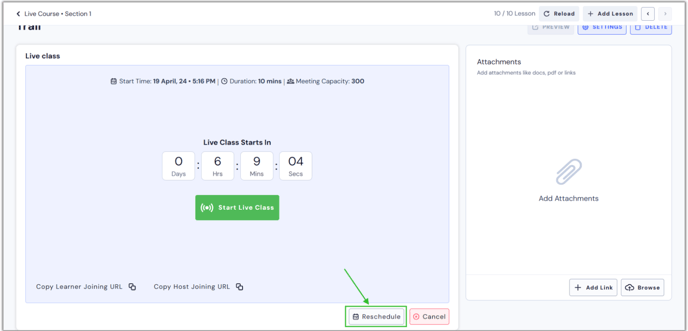
- If you want to reschedule your meeting, click the Reschedule button. Once you've clicked it, you can set up the live class from the beginning
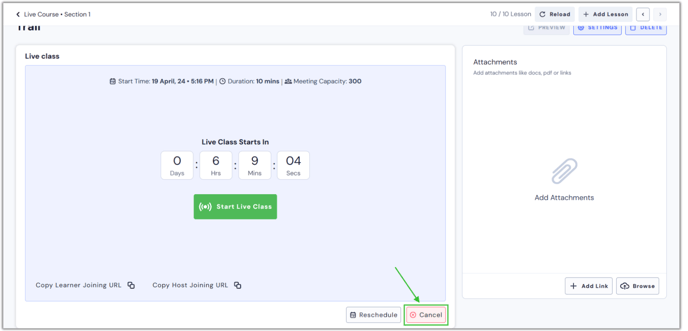
- You can also cancel the live class by clicking the Cancel button.
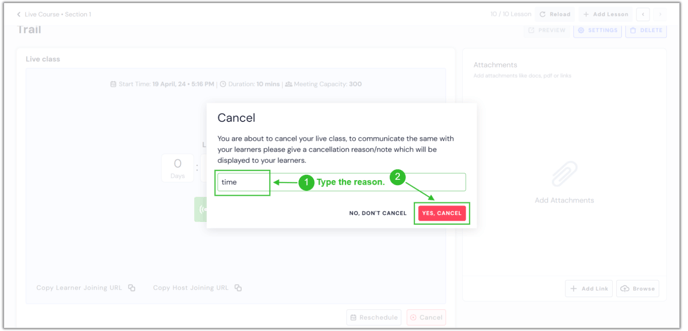
- When you click the cancel button, a confirmation pop-up appears on your screen. Enter the valid reason for the cancellation and click the Yes, Cancel button.
- To join the live class, click theStart Live Lesson button. It will redirect you to the Zoom Live platform.
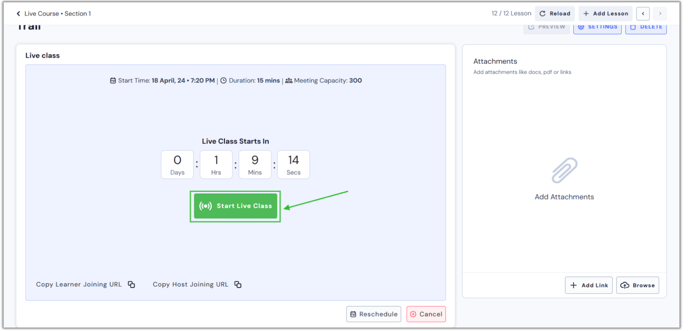
You can only begin the live session before 5 minutes.
- By following these steps, you can add live lessons to webinar.