- Support Center
- Get Started
-
Get Started
-
Website
-
Embeddables
-
Courses
-
Bundles
-
Batch
-
Code
-
Product Settings
-
Product Pricing
-
Mock test
-
Test Series
-
Ebooks
-
Podcasts
-
Webinars
-
Digital Products
-
Free Resource
-
Telegram
-
Learner Management
-
Quiz & Assessment
-
Content
-
Question Pool
-
Test Evaluation
-
Reports
-
Marketing
-
Forms
-
Workflows
-
CTA
-
Campaign
-
Integrations
-
Roles and Permissions
-
School Settings
-
Sub School
-
Ratings and Reviews
-
Learner Discussion
-
Mobile Apps
-
Reports (Old)
-
Intergrations
-
Zoom integration
-
Newsfeed
-
Payments
-
FAQs
-
Troubleshooting
-
Support
-
Content Security
-
Legacy Website Builder
-
Gamification
Publish your First course
After you've finished creating your course, follow the above steps to publish your first course
Step 1: Publish the pricing plan.
- To access the publish plan, please log in as an admin.
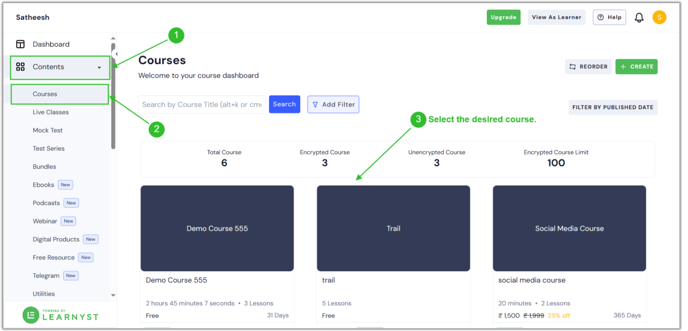
- You will arrive at the admin dashboard. Then, navigate to Contents > Courses and pick the desired course you want to publish.

- It will take you to this page. Now, click the "Settings" button.

- Then, under Pricing and Permissions, select the Pricing Plans option.
-1.png?width=688&height=331&name=publi%20(1)-1.png)
- Now select the Draft tab. Here, you can view all of your price plans. Click on any plan.
-1.png?width=688&height=331&name=publi%20(2)-1.png)
- You'll arrive at this page. Choose the Publish status option from the left-side menu bar.
-1.png?width=688&height=331&name=publi%20(3)-1.png)
- Now, select the Published option and click the Save button.
-1.png?width=688&height=331&name=publi%20(4)-1.png)
- Now your price plan has been successfully published.
Step 2: Publish the Course
- Return to the settings page after you've published your pricing plan. Now, scroll down and select the Publish Course option.
-1.png?width=688&height=331&name=publi%20(5)-1.png)
- Now, select the Live option and click the Save button.
-1.png?width=688&height=331&name=publi%20(6)-1.png)
- Your course is now visible to your learners, along with a price plan.
